CUDA-在Device上初始化

在GPU上初始化

绝大多数CUDA教材,都会提出一般CUDA程序的标准步骤,其中一步是将Host的数据拷贝到Device。也就是说Host中数据要先被初始化,后才能拷贝到Device。其实,可以直接在Device中初始化数据,如此既可以避免Host到Device的数据传输,又可以加快数据初始化的速度。如下是一个小例:

1
2
3
4
5
6
7
8
9
10
11
12
13
14
15
16
17
18
19
20
21
22
23
24
25
26
27
28
29
30
31
32
33
34
35
36
37
38
39
40
41
42
43
44
45
46
47
48
49
50
51
52
53
54
55
56
57
#include "cuda_runtime.h"
#include "device_launch_parameters.h"
#include <stdio.h>
#include <time.h>

#define N 10
//#define N 16384 // N*N = 268435456 // 1GB 4Bytes
//#define N 16384*2 // N*N = 268435456*4 // 4GB 4Bytes
//#define N 16384*4 // N*N = 268435456*16 // 16GB 4Bytes

__global__ void initOnGPU(int* dev_a){
int ix = blockIdx.x * blockDim.x + threadIdx.x;
int iy = blockIdx.y * blockDim.y + threadIdx.y;
int tid = ix * N + iy;

if (ix < N && iy < N){
// initialize on Device
dev_a[tid] = 321;
}
}

int main(){

// 1)
int* h_a;
h_a = (int*)malloc(N*N*sizeof(int));

int* dev_a;
cudaMalloc((int**)&dev_a, N*N*sizeof(int));


// 2) init on gpu
dim3 block(2, 2);
dim3 grid((N + block.x - 1), (N + block.y - 1));

clock_t start = clock();
initOnGPU <<< grid, block >>>(dev_a);
clock_t end = clock();
printf("Time init on GPU: %.10f \n", (double)(end - start) / CLOCKS_PER_SEC);

// 3)
cudaMemcpy(h_a, dev_a, N*N*sizeof(int), cudaMemcpyDeviceToHost);

// 4) show h_a
for (int i = 0; i < N*N; i++){
printf("%d ", h_a[i]);
if ((i + 1) % N == 0)
printf("\n");
}
printf("\n");

// 5)
free(h_a);
cudaFree(dev_a);

return 0;
}

解释一下:
1)分别在Host和Device上开辟空间h_adev_a
2)调用kernel,这个kernel的作用是初始化dev_a。注意并不是从Host中拷贝过去的。以及其他需要在GPU上执行的操作。
3)GPU上的操作完成后,得到的最终数据保存在dev_a中。拷贝到Hosth_a中。
4)显示最终计算结果。
5)释放资源。

其中kernel函数initOnGPU的作用是初始化dec_a中元素为321。

结果如下:

1
2
3
4
5
6
7
8
9
10
11
Time init on GPU: 0.0000160000 
321 321 321 321 321 321 321 321 321 321
321 321 321 321 321 321 321 321 321 321
321 321 321 321 321 321 321 321 321 321
321 321 321 321 321 321 321 321 321 321
321 321 321 321 321 321 321 321 321 321
321 321 321 321 321 321 321 321 321 321
321 321 321 321 321 321 321 321 321 321
321 321 321 321 321 321 321 321 321 321
321 321 321 321 321 321 321 321 321 321
321 321 321 321 321 321 321 321 321 321

所以说,直接在Device上初始化,相对先在Host上初始化后拷贝到Device,是更高效的。
CPU与GPU的通信是通过PCIe 实现的。PCIe第三代 的极限速度是 16GB每秒。相比较,费米架构的GPU中,GPU芯片与GPU存储之间的数据交换速度高达144GB 每秒。所以说Host和Device间的数据传输是CUDA应用的 性能瓶颈。

敲黑板 CUDA程序的一个基本规则是,尽可能减少host 与device间的数据交换。

CUDA-二维kernel的全局ID

确定2Dkernel 的thread 全局ID

假如我configure 了一个kernel:

1
2
3
4
int row;
int col;
dim3 block(12, 12);
dim3 grid((row + block.x - 1) / block.x, (col + block.y - 1) / block.y);

那么在__globla__中的全局thread ID 用如下方法确定:

1
2
3
4
5
6
7
8
9
10
11
12
13
14
15
16
17
18
19
20
21
__global__ void func(struct Points* dev_a, 
struct Points* dev_b,
struct Points p1, //注意 C是不支持传入参数的引用的
struct Points p2,
float* dev_c,
const int row,
const int col){

int ix = blockIdx.x * blockDim.x + threadIdx.x;
int iy = blockIdx.y * blockDim.y + threadIdx.y;
int tid = ix * col + iy; // 用这个公式来确定全局ID

if (ix < row && iy < col){
dev_b[tid].x = dev_a[tid].x + p1.x;
dev_b[tid].y = dev_a[tid].y + p1.y;

// 对每个元素进行所需要的操作,
Line(dev_b[tid], p1, p2);
getValue(dev_b[tid], dev_c[tid]);
}
}

其中int tid = ix * col + iy;用x和y两个方向的分量来确定threads的全局ID。

同理,在求矩阵转置时的kernel是如下实现的:

1
2
3
4
5
6
7
8
9
10
11
12
13
14
__global__ void transpose(int *m, int *mt){

int idx = blockIdx.x*blockDim.x + threadIdx.x;
int idy = blockIdx.y*blockDim.y + threadIdx.y;

int tidM, tidT;

if (idx < N && idy <N){
tidM = idx * N + idy;
tidT = idy * N + idx;

mt[tidT] = m[tidM]; // copy value from original matrix to transpose matrix
}
}

其中tidM = idx * N + idy;为原矩阵的thread ID。tidT = idy * N + idx;是转置后的矩阵thread ID。

CUDA-理解线程ID

理解线程ID

从线程逻辑结构上讲,所有线程有三层结构:threads,blocks,grids。每一层有三个维度:x,y,z。下面小例子展示了CUDA是怎样给不同的threads编号的:

假如我配置的kernel如下:

1
2
3
int nElem = 6;
dim3 block(3);
dim3 grid((nElem + block.x - 1) / block.x);

grid中结果为2,所以在kernel中:

1
checkDeviceIndex <<< grid, block >>>();

grid处为2,block处为3,即<<<2, 3>>>. 表示有2个blocks,每个blocks中有3个threads。其结构如下图:

一个蓝色矩形表示一个block,一个曲线箭头表示一个thread,在本例中一个grid由两个blocks 组成。

解释为:
对于grid

在x方向为2,表示在x方向由2个blocks。
y方向为1,表示在y方向上有1个block。
z方向为1,表示在z方向有1个block。

对于block

在x方向为2,表示在x方向上有3个threads。
y方向为1,表示在y方向上有1个thread。
在方向为1,表示在z方向上有1个thread。

threads是构成blocks和grids的最小单位,也是执行操作的最小单位。

从执行结上检验上述:

1
2
printf("grid.x %d grid.y %d grid.z %d \n", grid.x, grid.y, grid.z);
printf("block.x %d block.y %d block.z %d \n", block.x, block.y, block.z);

结果为:

1
2
grid.x=2 grid.y=1 grid.z=1 
block.x=3 block.y=1 block.z=1

与上述描述相符。

那么在kernel中是如何编号的呢!设计kernel:

1
2
3
4
5
6
7
8
9
__global__ void checkDeviceIndex(){

printf("threadIdx:(%d, %d, %d)\n", threadIdx.x, threadIdx.y, threadIdx.z);
printf("blockIdx:(%d, %d, %d)\n", blockIdx.x, blockIdx.y, blockIdx.z);

printf("blockDim:(%d, %d, %d)\n", blockDim.x, blockDim.y, blockDim.z);
printf("gridDim:(%d, %d, %d)\n", gridDim.x, gridDim.y, gridDim.z);

}

表示每一个thread都会打印4条信息,共有2*3=6个threads。结果为:

1
2
3
4
5
6
7
8
9
10
11
12
13
14
15
16
17
18
19
20
21
22
23
24
threadIdx:(0, 0, 0)
threadIdx:(1, 0, 0)
threadIdx:(2, 0, 0)
threadIdx:(0, 0, 0)
threadIdx:(1, 0, 0)
threadIdx:(2, 0, 0)
blockIdx:(0, 0, 0)
blockIdx:(0, 0, 0)
blockIdx:(0, 0, 0)
blockIdx:(1, 0, 0)
blockIdx:(1, 0, 0)
blockIdx:(1, 0, 0)
blockDim:(3, 1, 1)
blockDim:(3, 1, 1)
blockDim:(3, 1, 1)
blockDim:(3, 1, 1)
blockDim:(3, 1, 1)
blockDim:(3, 1, 1)
gridDim:(2, 1, 1)
gridDim:(2, 1, 1)
gridDim:(2, 1, 1)
gridDim:(2, 1, 1)
gridDim:(2, 1, 1)
gridDim:(2, 1, 1)

根据threads ID的计算公式:int tid = threadIdx.x + blockIdx.x * blockDim.x
可以得到6个threads的ID分别是:
0 + 0 × 3 = 0,
1 + 0 × 3 = 1,
2 + 0 × 3 = 2,
0 + 1 × 3 = 3,
1 + 1 × 3 = 4,
2 + 1 × 3 = 5,

可以看出,CUDA kernel是根据公式给每一个threads编号的,保证每个threads有唯一的ID。

CUDA-几点要记住-更新ID

Bare in mind:

  • 不管你的数据是一维的二维的还是更高维度的,在GPU端,高维被扁平化,都将被看成一维的,所以么有必要在Device上开辟,比如,一个二维数组。
  • CUDA code 需要你并行地思考:Think parallel.
  • 当你在写CUDA code, 实际上你是在为一个thread 写串行code,而每一个thread都执行这个段相同的串行code。看下图体会。
  • 可以这样理解,对于简单问题,把CPU code的for 循环去掉,其实就得到了GPU code。每个thread 有自己唯一的ID,其他都一样。

配置kernel

  • 当GPU可用的thread非常多,而当前所需解决的任务规模并不大时,可以一次invoke 足量的threads,这样便不用更新threads ID。如下:

    1
    2
    3
    4
    5
    6
    #define N 1<<7
    ...
    int block(1024);
    int grid ((N + block.x - 1) / block.x );

    kernal_func <<<grid, block >>>(d_c, d_a, d_b);

    或者二维的configuration:

    1
    2
    3
    4
    5
    6
    #define N 1<<7
    ...
    dim3 block (1024, 1024);
    dim3 grid (( N + block.x -1) / block.x, (N + block.y -1) / block.y );

    kernel_func <<<grid, block >>>(dev_m, dev_mt);

    当然所有的configuration都应该在你的GPU硬件极限内。

  • 当数据量很大时,所有CUDA cores 就需要工作不止一波,第一波后,就需要更新threads ID 继续工作下一波:

    1
    2
    3
    4
    5
    6
    7
    8
    __global__ void add(int *a, int *b, int *c) {
    int tid = threadIdx.x + blockIdx.x * blockDim.x;
    while (tid < N) {
    c[tid] = a[tid] + b[tid];
    // OPERATIONS
    tid += blockDim.x * gridDim.x; // update id when #threads are less than #elements
    }
    }

    此处的while循环 表示,只要threads ID 还小于元素个数N,就更新ID。

CUDA-Linux下计时器-GPU信息-Device函数修饰词

CUDA 中修饰函数的三个修饰词

__global__ : 此函数由CPU调用,在GPU端执行。可调用自身或者两一个global函数。

__host__: 此函数由CPU调用,在CPU端执行。一般默认省略。在CPU端只能调用global函数,不能调用device函数。

__device__ : 此函数由GPU调用,在GPU端执行。只能由global函数或device函数调用。可调用device函数。

实例

1
2
3
4
5
6
7
8
9
10
11
12
13
14
15
16
17
18
19
20
21
22
23
24
//add 1 for each element in the vector. 
//__device__ functions can be called by __gloable__ functions
__device__ void addOne(float& z){
z += 1;
}

// add yourself to you
//__device__fucntions can be called by __device__ functions
__device__ void addSelf(float& z){
z += z;
addOne(z);
}

// 1) add __global__ to kernel, AKA device code
__global__ void add(const float* x, const float* y, float* z){
int tid = threadIdx.x + blockIdx.x * blockDim.x;

if (tid < N){
z[tid] = x[tid] + y[tid];
addSelf(z[tid]);
}
}

体会`Think Parallel`

在CPU端, 只能调用add()。在add() 函数中,对于每一个线程,除了元素求和之外,还调用了addSelf() 函数。因为addSelf() 由__device__修饰,所以可以被add() 函数调用。

在addSelf() 函数中,每个元素自己加上自己,后调用了另一个__device__函数: addOne():元素加一。

Linux 下的计时器

<sys/time.h>中:

1
2
3
4
5
6
7
8
9
10
11
12
13
14
15
16
#include <sys/time.h>
#include <stdio.h>

double cpuSecond() {
struct timeval tp;
gettimeofday(&tp,NULL);
return ((double)tp.tv_sec + (double)tp.tv_usec*1.e-6);
}


int main(){
double iStart = cpuSecond();
// Do what ever you want here
double iElaps = cpuSecond() - iStart;
printf("time: %.10f \n", iElaps);
}

获得当前使用GPU的信息

这应当是写CUDA code的第一步,了解你所用工具的基本信息。

当机器由不止一个GPU时,需要知道当前由多少个GPU,默认使用哪一个,指定使用哪一个。

  • 可使用(CUDA-enabled)的GPU个数: cudaGetDeviceCount()

    1
    2
    3
    int deviceCount = 0;
    cudaError_t error_id = cudaGetDeviceCount(&deviceCount);
    printf("Device number: %d\n", deviceCount);

    GPU个数存在deviceCount中, 此时可以使用循环来打印各个GPU的信息:

    1
    2
    3
    4
    5
    6
    7
    8
    9
    10
    11
    12
    13
    14
    15
    for (dev = 0; dev < deviceCount; ++dev) {  
    cudaSetDevice(dev); // 制定使用索引为dev的GPU
    cudaDeviceProp deviceProp; // 创建一个property对象
    cudaGetDeviceProperties(&deviceProp, dev); //得到这个GPU的property

    printf("\nDevice %d: \"%s\"\n", dev, deviceProp.name);
    cudaDriverGetVersion(&driverVersion);
    cudaRuntimeGetVersion(&runtimeVersion);

    printf(" CUDA Driver Version / Runtime Version %d.%d / %d.%d\n",
    driverVersion / 1000, (driverVersion % 100) / 10, runtimeVersion / 1000, (runtimeVersion % 100) / 10);
    printf(" CUDA Capability Major/Minor version number: %d.%d\n",
    deviceProp.major, deviceProp.minor);

    }
  • 当前使用哪一个GPU: cudaGetDevice()

    1
    2
    3
    4
    5
    6
    7
    8
    // the device that is currently used
    void setupDevice(){
    int dev;
    cudaGetDevice(&dev);
    cudaDeviceProp prop;
    cudaGetDeviceProperties(&prop, dev);
    printf("\nDevice name %d: %s \n", dev, prop.name);
    }
  • 制定使用哪个GPU: cudaSetDevice()

    1
    2
    int dev = 2;
    cudaSetDevice(dev); // 使用索引为2 的GPU

CUDA-PCIe速率

检测PCIe的数据传输速度

当从Host 拷贝数据到Device的过程中,数据需要通过PCIe实现拷贝。所以你的主板的PCIe的版本和传输速度就会影响CUDA 代码的效率。

首先你需要知道你的GPU的显存大小。比如我的P106 有6GB 的VRAM。然后分别传输1GB,2GB,… 的数据。

假如传输int型数据,根据:

1
printf("this TYPE size: %lu Bytes\n", sizeof(TYPE));

来得到所使用的机器存储一个int型所需多少空间。我的机器存储int型需要4Bytes。

如果要传输3GB的数据,那么所需int型数据的数量为:

1
2
1GB = 1024*1024*1024*1 Bytes
1GB / 4Byte = 268435456

将这个数赋值给N。

之后,分别在Host和Device上开辟空间,最后计时从Host拷贝到Device所需时间:

1
2
3
4
5
6
7
8
9
10
11
12
13
14
15
16
17
18
19
20
#define N 268435456  // 1GB int

int* h_a;
h_a = (int*)malloc(N*sizeof(int));

int* dev_a;
cudaMalloc((int**)&dev_a, N*sizeof(int));

for (int i = 0; i < N; i++){
h_a[i] = 0;
}

clock_t start = clock();
cudaMemcpy(dev_a, h_a, N*sizeof(TYPE), cudaMemcpyHostToDevice);
clock_t end = clock();
printf("time: %.10f s \n", (double)(end - start) / CLOCKS_PER_SEC);


free(h_a);
cudaFree(dev_a);

之后可以逐步增加数据量,知道VRAM极限。如下是实验结果,传输数据量及所需时间:

1
2
3
4
5
6
7
8
9
1GB: 268435456    //  1.349s
2GB: 268435456*2 // 2.700s
3GB: 268435456*3 // 4.050s
4GB: 268435456*4 // 5.400s
5GB: 268435456*5 // 6.750s
5.5GB: // 7.430s
5.75GB: // 7.760s

6GB: 268435456*6 // 0.000s

6GB 的数据错误是因为VRAM不可能全部给用户使用。
所传输数据量越大,经过PCIe传输时间也就越长。这样可以感受PCIe的速度。

回顾cpp-继承-二

  • 继承方式 check
  • 隐藏 check
  • 多继承 check
  • 多重继承 check
  • 虚继承 check

多继承

类间关系是

一个子类由多个不同的父类:可飞行 <- 蝙蝠,哺乳动物 <- 蝙蝠,蝙蝠 Is-a 可飞行,同时 Is-a 哺乳动物。而可飞行与哺乳动物没有任何关系。具体实现可以是这样:

1
2
3
class Flyable{};
class Mammal{};
class Bat : public Flyable, public Mammal{};

实例化一个Bat子类时,会先调用其所有的父类构造函数,再调用所有子类构造函数。析构函数会以相反的顺序被调用。

多重继承

类间关系是

Human被Asion继承,Asion被Chinese继承:Human <- Asion <- Chinese,三者由一下关系:Chinese Is-a Asion,Chinese Is-a Human,AsionIs-a Human。具体实现可以是这样:

1
2
3
class Human{};
class Asion : public Human{};
class Chinese : public Asion{};

虚继承

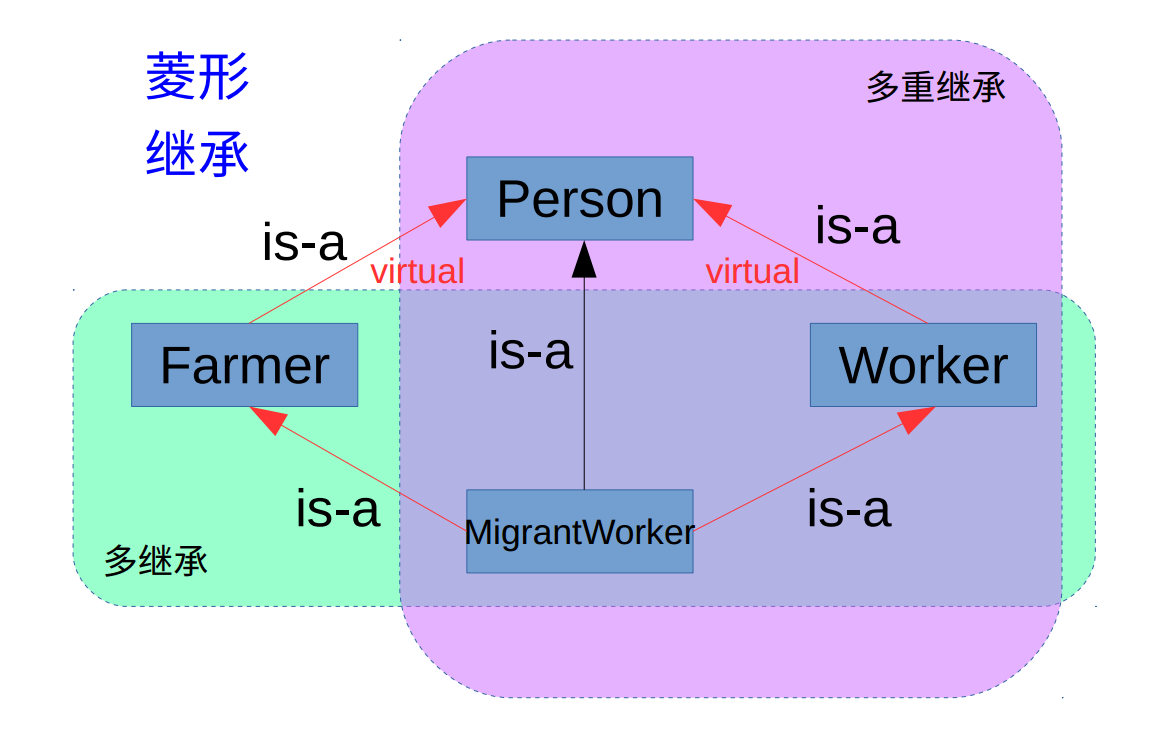
复杂的继承关系,如菱形继承:

为什么会有虚继承。因为在继承过程中,为了避免MigrantWorker继承两次Person,使用virtual关键字,实现如下:

1
2
3
4
class Person {};
class Worker : virtual public Person {};
class Farmer : virtual public Person {};
class MigrantWoker : public Worker, public Farmer {};

敲黑板为避免重复继承,使用虚继承virtual

数值优化算法-BGD-SGD

  • 作用是优化一个目标函数,它是一个基于搜索的数值优化算法。具体说来,当需要最小化一个损失函数,使用梯度下降;当最大化一个效用函数时,使用梯度上升发。
  • 在线性回归中使用的是最小二乘法得到最终结果,而对于许多机器学习算法,其最小化损失函数的方法是不能使用类似最小二乘法直接求解的。此时可以考虑借鉴数值计算方法中的凸优化问题的解法。
  • 目标函数是参数的函数,输入数据是常量。所以目的是找到目标函数取最小值时的参数。
  • 搜索可能陷入局部最优解,解决方法有比如动量梯度下降,跳出局部最优值。还可以多次运行GD,每次的起始点随机化。
  • 线性回归问题的目标有唯一的最优解,(凸优化问题)
  • 当目标函数是凹函数时,才求最小值。目标函数对参数求导数,得到梯度。梯度表示这一点的切线斜率的值。根据参数迭代公式:当在某一点的梯度小于0时,迭代后参数值增大,即对应的目标函数值减小;当在某一点的梯度大于0时,迭代后参数值变小,即目标函数值减小。可见,不管点的位置在哪,迭代参数后,目标函数值都减小。(详见数学笔记)

模拟梯度下降

先创建一个数据集,使其图像为凹函数:

1
2
x = np.linspace(-1, 6, 200)
y = (x-2.5)**2-1

x为参数,y为目标函数。y对x求导数:

1
2
3
def gradient(theta):
"""计算梯度"""
return 2*(theta-2.5)

对x求对应y:

1
2
3
4
5
6
def loss(theta):
"""对应目标函数值"""
try:
return (theta-2.5)**2-1
except:
return float('inf') # 当J太大时,返回浮点最大值

根据迭代公式,编码:

1
2
3
4
5
6
7
8
9
10
11
learning_rate = 0.1
epsilon = 1e-8
theta = 0
theta_history = [theta]
while True:
grad = gradient(theta)
last_theta = theta
theta = theta - learning_rate * grad
theta_history.append(theta)
if (abs(loss(theta)- loss(last_theta)) < epsilon):
break

其中,epsilon是一个很小的值,当abs(loss(theta)- loss(last_theta)) < epsilon时,表示迭代参数使得目标函数值达到最小值。为什么不是当梯度为零停止迭代呢,因为浮点数0,在计算机中不是零,这样,就本实验而言循环不会停止。

theta_history记录了每次迭代的参数值。
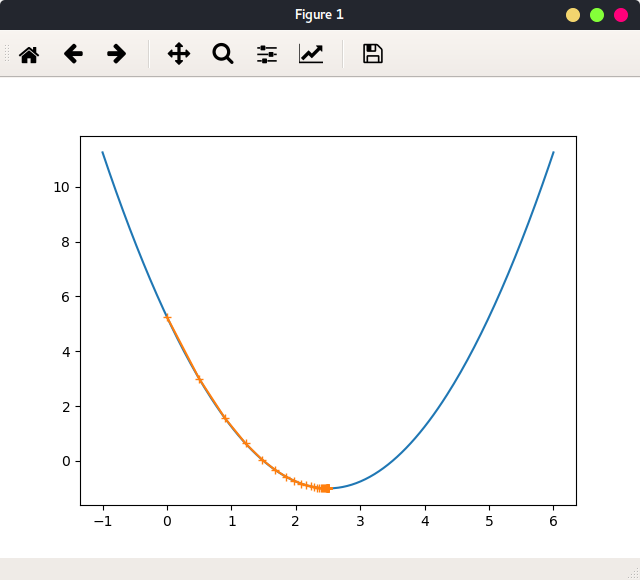
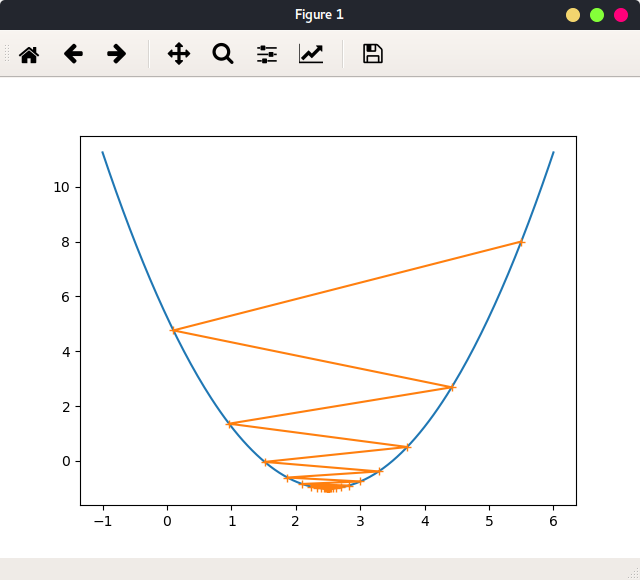
learning_rate = 0.1,theta = 0时绘出函数图像,及参数迭代路径:

1
2
3
plt.plot(x, y)
plt.plot(np.asarray(theta_history), loss(np.asarray(theta_history)), marker='+')
plt.show()

如图:

一共迭代了46次,最终停在点(2.499891109642585, -0.99999998814289),与最小值点(2.5, -1)非常接近。这表明了算法的正确性。

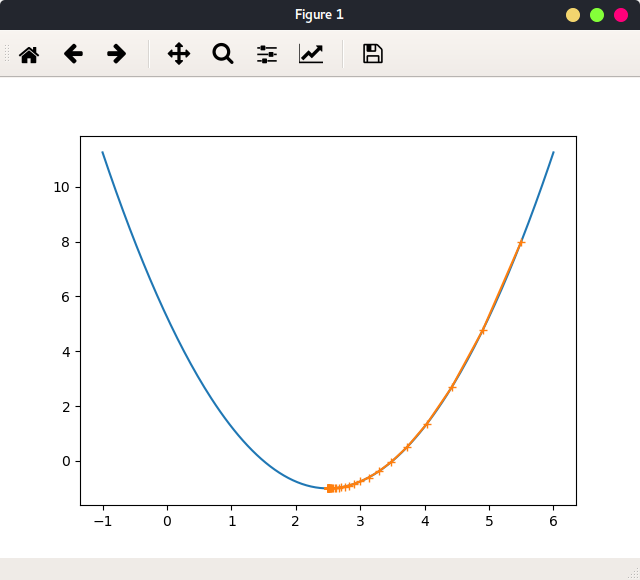
当当learning_rate = 0.1,theta = 5.5时绘出函数图像,及参数迭代路径:

可以看出,不论参数初始值在哪,最终会停在最小值处。

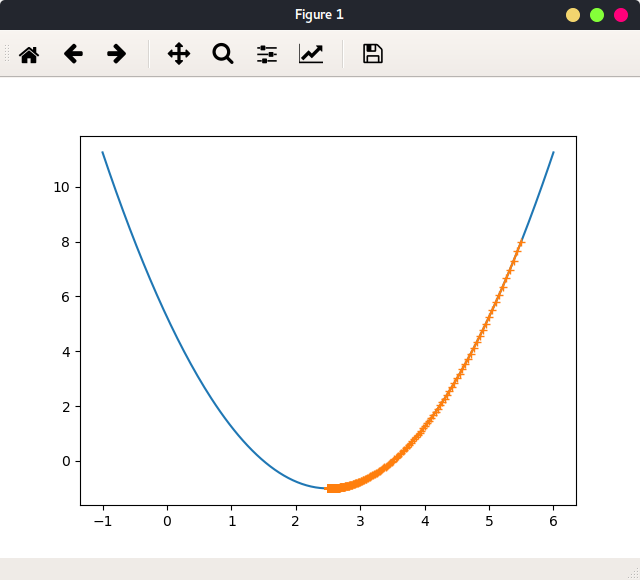
当学习率较小时:learning_rate = 0.01,theta = 5.5绘出函数图像,及参数迭代路径:

依旧停在最小值处,但是迭代次数增加到433次。

当学习率较大时:learning_rate = 0.9,theta = 5.5绘出函数图像,及参数迭代路径:

可以看出,学习率较大时,迭代路径在最优值左右震动。

为了避免迭代无止境的循环下去,设置参数n_itr,表示最大迭代次数。

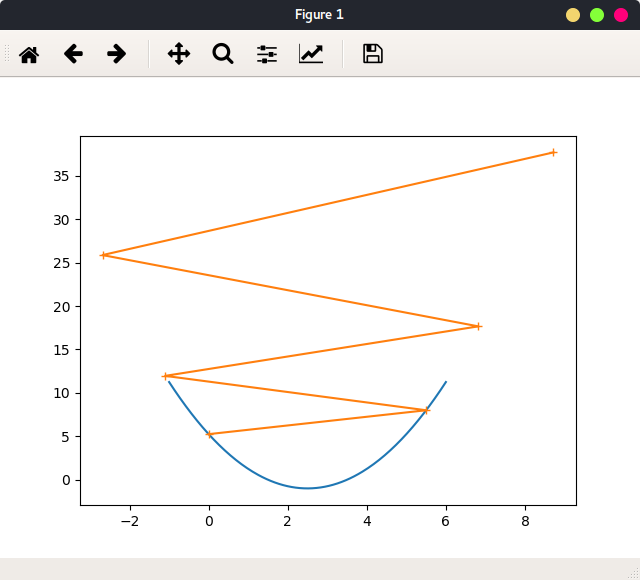
当设置学习率过大时,learning_rate = 1.1``theta = 0,n_itr=5,出现梯度上升情况,如图:

限定只迭代5次。

所以要设置最合适的学习率。

程序

以上实现过程:

1
2
3
4
5
6
7
8
9
10
11
12
13
14
15
16
17
18
19
20
def gradient_descent(init_theta, learning_rate, n_itr, epsilon=1e-8):
theta = init_theta
theta_history.append(theta)
i_itr = 0

while i_itr < n_itr:
gradient = dJ(theta)
last_theta = theta
theta = theta - learning_rate*gradient
theta_history.append(theta)

if (abs(J(theta) - J(last_theta)) < epsilon):
break
i_itr += 1


def plot_theta_history():
plt.plot(x, y)
plt.plot(np.asarray(theta_history), J(np.asarray(theta_history)), marker='+')
plt.show()

调用:

1
2
3
4
5
learning_rate = 0.1
theta_history = []

gradient_descent(0, learning_rate, 5)
plot_theta_history()

多元线性回归的GD

python数据行为

创建一个一维向量:

1
2
np.random.seed(123)
x1 = 2 * np.random.random(size=100)

x1的内容如下:

1
[ 1.39293837  0.57227867  0.45370291 ... 1.10262954  1.43893794 ]

x1是一个长度为100的一维向量。向量每个元素为一个标量。用 同样的方式在创建一个等长度的一维向量x2:

1
x2 = 3 * np.random.random(size=100)

假如变量y由x1和x2共同决定:

1
y = x1 * 3 + x2 * 4 + (5 + np.random.normal(size=100))

此时x1和x2作为输入样本的两个特称,现在把两者合并在一起:
第一步变形为1列:

1
x1.reshape(-1, 1)

返回一个二维向量,每一个元素为一个长度为1的一维向量,每一个元素表示一个样本:

1
2
3
4
5
6
7
[[ 1.39293837]
[ 0.57227867]
[ 0.45370291]
...
[ 1.10262954]
[ 1.43893794]
[ 0.84621292]] 100X1

第二步,将两个特征合并在一起:

1
X = np.hstack([x1.reshape(-1, 1), x2.reshape(-1, 1)])

返回X为一个二维向量,这个向量的每个元素为一个样本,每个样本由两个值表达:

1
2
3
4
5
6
7
[[ 1.39293837  1.53938446]
[ 0.57227867 1.99987365]
[ 0.45370291 0.31772546]
...
[ 1.10262954 0.39268485]
[ 1.43893794 0.96594182]
[ 0.84621292 1.98469301]] 100X2

因为y的组成还有一个常量,可以用x0表示,x0恒为1,并且把x0也X中:

1
X_b = np.hstack([np.ones((len(X), 1)), X])

返回X_b 中每个元素由3个值决定:

1
2
3
4
5
6
7
[[ 1.          1.39293837  1.53938446]
[ 1. 0.57227867 1.99987365]
[ 1. 0.45370291 0.31772546]
...
[ 1. 1.10262954 0.39268485]
[ 1. 1.43893794 0.96594182]
[ 1. 0.84621292 1.98469301]] 100X3

现在可以看看X_b 的属性:

1
2
3
4
print(type(X_b))
print(X_b.shape)
print(X_b.shape[0])
print(X_b.shape[1])

返回:

1
2
3
4
<class 'numpy.ndarray'>    # 是一个 numpy.ndarray 对象
(100, 3) # 矩阵 100行 3列
100 # 外维度 100
3 # 内维度 3

100行表示,一共有100个样本,3列表示每个样本有3个特征。

因为此时X_b是一个矩阵,所以还可以对X_b进行切片操作,就是取它是一部分:
取索引为0的元素,即第一行,所有列:

1
2
3
print(X_b[0, :])

[ 1. 1.39293837 1.53938446]

取所有行,索引是0和1的列:

1
2
3
4
5
6
7
8
9
print(X_b[:, 0:2])

[[ 1. 1.39293837]
[ 1. 0.57227867]
[ 1. 0.45370291]
...
[ 1. 1.10262954]
[ 1. 1.43893794]
[ 1. 0.84621292]] 100X2

其他函数的用法:
np.ones((4, 2)):创建矩阵4行2列。

dot()

.dot()numpy.ndarray对象的方法,实例:
X_b是100X3的矩阵,theta为长为3的向量,y为长度为100 的向量,则:

X_b.dot(theta) 结果为长度为100 的向量。
y - X_b.dot(theta)结果为长度为100的向量。
(y - X_b.dot(theta))**2 结果为长100 的向量。平方差。

np.sum((y - X_b.dot(theta))**2) 结果为100个数就和。 平方差之和。
np.sum((y - X_b.dot(theta))**2) / len(X_b) 就是MSE。

对象.dot(参数)对象是一个矩阵,它的每一行代表一个样本,所有行表示所有样本。参数是一个向量,这个向量中每一个值分别与对象的每一行的每个值相乘后相加,最后得到一个与参数大小一样的向量。

BGD算法过程

目标:最小化loss:

1
2
3
4
5
6
def loss(theta, X_b, y):
"""目标函数"""
try:
return np.sum((y - X_b.dot(theta))**2) / len(X_b)
except:
return float('inf')

迭代过程中需要求梯度:

1
2
3
4
5
6
7
def gradient(theta, X_b, y):
"""loss对参theta的梯度"""
res = np.empty(len(theta))
# 根据数学推到得 梯度的三个分量:
for i in range(0, len(theta)):
res[i] = (X_b.dot(theta) - y).dot(X_b[:, i]) # dot操作中左后一步是Sum
return res * 2 / len(X_b)

其中res[i]的值所用公式见数学笔记。

GD的过程如下,输入样本X_b已知, y表示真是拟合值,只需要初始化参数theta就可执行GD。
init_theta = np.zeros(X_b.shape[1]) 初始值为0。

1
2
3
4
5
6
7
8
9
10
11
12
13
def gradient_descent(X_b, y, init_theta, learning_rate=0.01, n_itr=1000, epsilon=1e-8):
theta = init_theta
i_itr = 0

while i_itr < n_itr:
grad = gradient(theta, X_b, y)
last_theta = theta
theta = theta - learning_rate*grad

if (abs(loss(theta, X_b, y) - loss(last_theta, X_b, y)) < epsilon):
break
i_itr += 1
return theta

调用GD:

1
2
3
4
theta = gradient_descent(X_b, y, init_theta, learning_rate=0.01, 2000)

得到迭代最终的参数theta:
[ 5.09735976 2.81188565 4.01306057]

结果分别对应(5 + np.random.normal(size=100),3,4。

其中,对于求梯度,观察式子,发现可以使用向量化实现:

1
2
3
def gradient_vectorize(theta, X_b, y):
"""向量化"""
return X_b.T.dot(X_b.dot(theta)-y) * 2/len(X_b)

归一化

当样本的每种特征数值量级差别很大时:

1
2
3
4
[  6.32000000e-03   1.80000000e+01   2.31000000e+00   0.00000000e+00
5.38000000e-01 6.57500000e+00 6.52000000e+01 4.09000000e+00
1.00000000e+00 2.96000000e+02 1.53000000e+01 3.96900000e+02
4.98000000e+00]

使用一般的步长,得到的结果在python中为nan。因为特征数值相差太大时,一般的步长也变得很大很大(步长对数据特征值之差敏感)。此时减小步长,增加迭代次数也就可以达到结果,但效率很低。

所以使用梯度算法前,要对数据进行归一化。

SGD

随机梯度下降法,每次处理一个样本,马上计算一次梯度(见数学笔记)。与BGD相比,SGD的loss函数改变了:
BGD的loss是将所有样本带入目标函数后的结果(看公式)。而SGD的loss是把当前这一个样本带入目标函数的结果

所以,BGD的参数迭代路径的方向是由所有样本决定,是实际方向。而SGD的参数路径是曲折的,因为每一步只是由一个样本得到,这个方向不能代表所有样本的实际方向。

SGD一般设置学习率为变化值。learning_rate = a / (itr+b)

SGD实现:

1
2
3
4
5
6
7
8
9
10
11
12
13
14
15
16
17
18
19
20
21
22
23
def gradient_vectorize(theta, X_b_i, y_i):
"""每一个样本的梯度"""
return X_b_i.T.dot(X_b_i.dot(theta)-y_i) * 2


def SGD(X_b, y, init_theta, n_itr):

t0 =5
t1 = 50

# 变化的学习率
def learning_rate(t):
return t0/(t+t1)

theta = init_theta
for itr_i in range(n_itr):
# 随机选一个索引:
curr_sample_id = np.random.randint(len(X_b))
# 取出该索引对应的样本,计算对应样本的梯度:
grad = gradient_vectorize(theta, X_b[curr_sample_id], y[curr_sample_id])
# 根据一个样本更新梯度:
theta = theta - learning_rate(itr_i) * grad
return theta

敲黑板

  • 本篇笔记的GD算法是一次性把所有样本带入,也就是遍历一遍所有样本才更新一次参数。称为BGD
  • 向量化速度快
  • 与步长有关的迭代算法,首先要对数据进行归一化。
  • 常用python函数
  • BGD和SGD的loss函数是不同的,BGD在迭代过程中目标函数不变,而SGD的loss随每个样本而改变。

回顾cpp-继承-一

  • 继承方式 check
  • 隐藏 check
  • 多继承
  • 多重继承
  • 虚继承

定义类

定义一个base class(父类,基类)(虚析构函数),和一个derived class(子类,派生类):

1
2
3
4
5
6
7
8
9
10
11
12
13
14
15
class Person{
public:
Person(){ cout<<" Person() "<<endl; }
virtual ~Person(){ cout<<" ~Person() "<<endl; }

string m_strName;
};

class Worker : public Person{
public:
Worker(){ cout<<" Worker() "<<endl; }
~Worker(){ cout<<" ~Worker() "<<endl; } // 非虚

int m_iSalary;
};

derived class析构函数的虚拟性继承于base class,所以也是virtual

一个derived class继承base class,那么derived class对象在内存中,既有derived class自身定义的成员属性m_iSalary,又有从base class继承来的成员属性m_strName
拷贝所继承的内容到内存。

实例化对象

在堆中实例化derived class对象,当使用类指针指向类对象时:

1
2
3
4
5
6
7
int main(){
Worker *worker = new Worker();

delete worker;
worker=NULL;
return 0;
}

在栈中实例化derived class对象时:

1
2
3
4
int main() {
Worker w;
return 0;
}

两种实例化方式输出相同:

1
2
3
4
Person() 
Worker()
~Worker()
~Person()

这说明了,实例化一个类,必然先实例化一个类。当内存中有了base class对象,其内容就可以被derived class继承下来。销毁对象时,先执行derived class析构函数,后执行base class析构函数。逆序。

如果在栈中实例化类对象:

1
Person person;

输出:

1
2
Person() 
~Person()

在堆中实例化base class对象:

1
2
3
Person *p = new Person();
delete p;
p = NULL;

输出:

1
2
Person() 
~Person()

由结果得出,与代码执行与derived class无关。

但是,当使用类指针指向类对象时:

1
2
3
Person *p = new Worker();
delete p;
p = NULL;

输出:

1
2
3
4
Person() 
Worker()
~Worker() // 因为析构函数是虚函数,所以执行父子的析构函数都被执行
~Person()

这种情况也执行了类的析构函数。因为定义了类和类析构函数为虚析构函数

但是如果没有virtual修饰父子类的析构函数,那么derived class的析构函数不会被执行。这造成了一个“局部销毁”现象。会造成资源泄露,数据结构被破坏。(Effective C++ 中的条款7)。

继承方式

公有继承:

base class的public属性被继承到derived classpublic下,
base class的protected属性被继承到derived classprotected下,
base class的private属性被继承到derived class不可见位置,即没有被继承。

保护继承:

base class的public,protected成员都被继承到derived class的protected下,
base class的private成员不被继承。

私有继承:

base class的public,protected成员被继承到derived class的private下,
base class的private不被继承。

隐藏

给上述base classderived class增加一个同名非虚函数print()

1
2
3
4
5
6
7
8
9
10
11
12
13
14
15
16
17
class Person{
public:
Person(){ cout<<" Person() "<<endl; }
virtual ~Person(){ cout<<" ~Person() "<<endl; }
void print(){ cout<<"Person print"<<endl; }

string m_strName;
};

class Worker : public Person{
public:
Worker(){ cout<<" Worker() "<<endl; }
~Worker(){ cout<<" ~Worker() "<<endl; } // 非虚
void print(){ cout<<"Worker print"<<endl; }

int m_iSalary;
};

代码只是实验用

如果main中:

1
2
Worker w;
w.print(); //`base class`print方法被隐藏

输出内容:

1
2
3
4
5
Person() 
Worker()
Worker print
~Worker()
~Person()

只执行类同名函数,base class同名函数被隐藏

但是,也是可以强制调试用base class同名函数:

1
2
3
4
Worker w;
w.Person::print(); //调用`base class`print方法
// 输出
Person print

同样的,如果main中用类指针指向类对象:

1
2
3
4
Person *p = new Worker();   // `base class`指针指向`derived class`对象
p->print();
delete p;
p = NULL;

输出内容:

1
2
3
4
5
Person() 
Worker()
Person print
~Worker()
~Person()

因为p是base class指针,所以调用base class的同名函数。但是很多时候是用base class指针指向derived class对象,此时我希望指针指向哪个derived class,就调用哪个derived class的同名函数。要想实现这个功能,只需在base class的同名函数前用virtual修饰。

virtual的目的是允许derived class的同名函数的实现客制化。

所以实际中要这样定义:

1
2
3
4
5
6
7
8
9
10
11
12
13
14
15
16
17
class Person{
public:
Person(){ cout<<" Person() "<<endl; }
virtual ~Person(){ cout<<" ~Person() "<<endl; } // 虚
virtual void print(){ cout<<"Person print"<<endl; } // 虚

string m_strName;
};

class Worker : public Person{
public:
Worker(){ cout<<" Worker() "<<endl; }
~Worker(){ cout<<" ~Worker() "<<endl; }
void print(){ cout<<"Worker print"<<endl; }

int m_iSalary;
};

is-A

解释了为什么通常这样写:Person *p = new Worker();,而不是Worker *p = new Worker();

有两个类:base class“人”,derived class“亚洲人”。derived class继承base class,此时称“亚洲人”is-A”人“。实例如下:

1
2
3
4
5
int main(){
Asian a1;
Person p1 = a1; // `derived class`对象可以复制给`base class`
Person *p2 = &a1; // `base class`指针可以指向`derived class`对象
}

这是正确地:

例中,先实例化一个Asian对象a1,后实例化一个Person对象p1a1初始化p1,可以表达Asian is-A Person。即derived class对象可以复制给base class。或说base class指针可以指向derived class对象

但当关系反过来就不对了:

1
2
3
4
5
int main(){
Person p1;
Asian a1 = p1;
Asian *a2 = &p1;
}

Person is-A Asian显然就不对了。

所以有了这条规律:derived class对象可以复制给base classbase class指针可以指向derived class对象

这样就可以将类的对象,或类的指针,或类的引用作为函数参数,来使得该函数可以接收类的对象或类对象。(这也说明了为什么之前总是使用base class指针指向derived class对象,不使用derived class指针就是防止derived class指针指向base class对象),实例:

1
2
3
void func1(Person *p){}
void func2(Person &p){}
void func3(Person p){}

当分别有一个base class对象和一个derived class对象,下面的调用没有违反上述规律或Is-A规律:

1
2
3
4
5
6
7
8
9
10
int main(){
Person p1;
Asian a1;

// 下面的函数调用都是可以的:
func1(&p1); func2(p1); func3(p1);
func1(&a1); func2(a1); func3(a1);

return 0;
}

func1()的参数是base class指针,所以既可以指向base class对象func1(&p1),又可以指向derived class对象func1(&a1)。三个函数都可以传入base classderived class的相关实参。

所以通常将函数参数类型指明为base class,避免错误

此外,func3()中传入的是Person对象的拷贝(先创建后拷贝),而func1()fucn2()的参数是指针和引用,不产生临时变量。

截断

如果一个对象类型是base class,那么它只能访问base class的成员,这个现象称为截断:

  1. 类对象赋值给类对象,即用类对象初始化类变量:

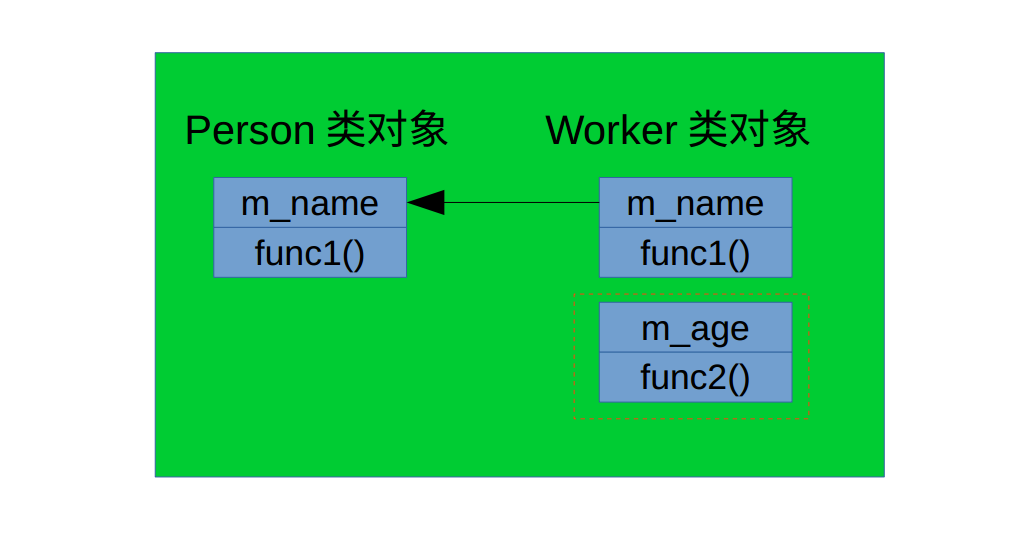
    由于derived class中有从base class继承过来的成员,当用derived class对象初始化base class变量时,derived class中继承来的成员会赋值给base class对象中对应的成员,而derived class自身的成员被截断。原因是,base class变量只能接收自身拥有的成员的数据,

    假如Worker类继承Person类。分别实例化两个对象,当用derived class对象初始化base class对象:

    1
    2
    3
    Worker w;
    Person p;
    p = w;

    两个对象在内存中的存储如下:

    Workerm_name 赋值给Personm_name,而且p只能调用函数func1()p只能访问base class成员。

  2. 类指针指向类对象:

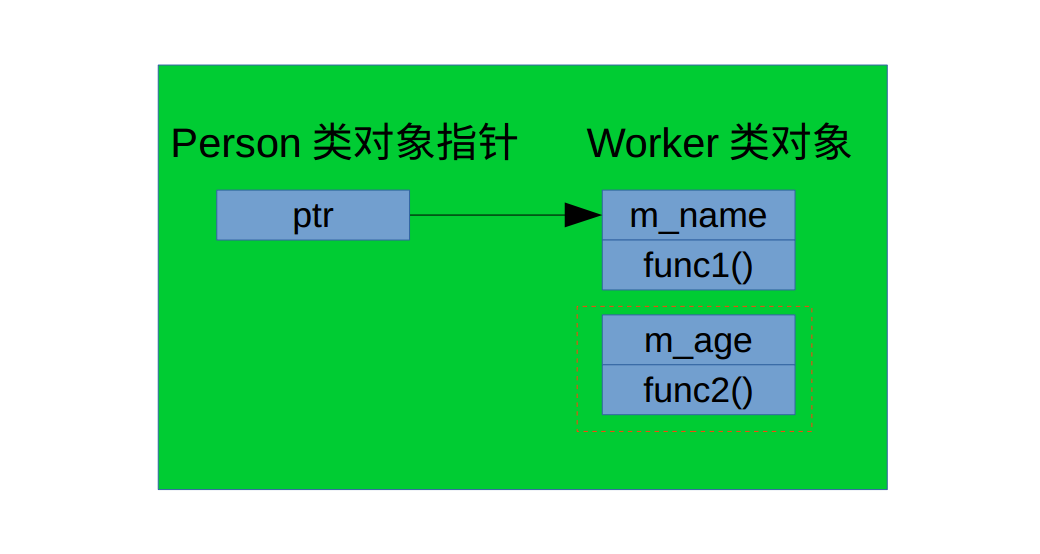
    base class指针也只能够访问到base class所拥有的数据成员。而无法访问到derived class自身的数据成员,derived class成员变量被截断

    当使用base class指针指向derived class对象:

    1
    Person p = new Worker("Woston", 100);

    同样地,Workerm_name 赋值给Personm_name,而且p只能调用函数func1()p只能访问base class成员。

敲黑板

  • is-A的逻辑不能错。
  • 如果一个对象类型base class,那么它只能访问base class的成员,