文本分类(二)-文本预处理II-词编码

接文本预处理(一),这篇笔记记录把分词后的记录编码为计算机可识别的数值型序列,如将[你好 呀 , 参加 比赛 了 吗]编码为[91, 57, 1, 31, 14, 6, 5]。同时编码类别。

词编码

在上一篇笔记中得到的vocab_file,再看一下其内容:

1
2
3
4
5
6
7
8
9
10
11
12
13
14
15
16
17
18
19
20
21
22
23
24
1 <UNK>   10000000
21871208
31390830
4822140
5303879
6258508
7248160
8240938
...
508 同样 5874
509 正式 5868
510 故事 5867
511 13 5855
512 建筑 5854
513 代表 5850
514 主持人 5843
515 水平 5833
...
359234 各偏 1
359235 1.8782 1
359236 1.0307 1
359237 0.763 1
359238 87.82% 1
359239 0.5376 1

每个词与其编号一一对应,可以用词的标号来对词进行编码。这就是下面主要做的事。

1. 一一对应

首先读取vocab_file,得到每个词,其编号,其频数,以{词:编号}为元素存入一个字典。同时指定一个整数threshold,当一个词的词频小于threshold,不再考虑该词,原因是频数太低的词没有统计意义。对每一条数据执行此操作,实现过程如下:

1
2
3
4
5
6
7
8
9
10
11
12
13
def _read_dict(self, filename):
""" read filename and generate {word: id} dict """
with open(filename, 'r') as f:
lines = f.readlines()
for line in lines: # 读词与词频
word, frequency = line.strip('\r\n').split('\t')
frequency = int(frequency)
if frequency < self._num_word_threshold:
continue
idx = len(self._word_to_id) # idx随_word_to_id大小递增
if word == '<UNK>': # 特殊处理UNK
self._unk = idx
self._word_to_id[word] = idx # 构建处字典:{词: idx}

最终得到目标dict:

1
{'<UNK>': 0, ',': 1, '的': 2, '。': 3, '在': 4, '、': 5, '了': 6, '是': 7,...,'铭记': 20350, '多时': 20351, '轩然大波': 20352,...,'孵化器': 39545, '党史': 39546, '纸飞机': 39547,...}

2. 编码

第二步,对于一个清洗后样本[你好 呀 , 参加 比赛 了 吗],从上一步得到的dict中找每一个key对应的value,从而生成[91, 57, 1, 31, 14, 6, 5]。实现过程:

1
2
3
4
5
def sentence_to_id(self, sentence):
""" 用词的idx编码每个句子 """
# 切分句子后的每个词,找它的idx,
word_ids = [self.word_to_id(cur_word) for cur_word in sentence.split()]
return word_ids

现在用一个样本做测试:

1
test_word = '你好 呀 , 参加 比赛 了 吗'

返回实际结果:

1
[9901, 5667, 1, 381, 124, 6, 445]

同样的方法,处理label,如:

1
科技的id: 8

上述完整过程在这里


到此到此为止,所有的样本都已用数字编码。下一步为模型提供数据,batch by batch

3. 生成batch

首先读取清洗后的样本文件,对于每一条记录中的类别和内容按照上述方式编码,并分别存储与两个list。编码完一条记录,加入到list中。最终的到的内容list和类别list。

实现如下:

1
2
3
4
5
6
7
8
9
10
11
12
13
14
15
16
with open(filename, 'r') as f:
lines = f.readlines()
for line in lines: # for each line,
label, content = line.strip('\r\n').split('\t')
# convert label and content to sequence of ids
id_label = self._catego_dict.category_to_id(label)
id_words = self._vocab_dict.sentence_to_id(content)
id_words = id_words[0: self._encoded_length] # cut
padding_length = self._encoded_length - len(id_words) # pad
id_words = id_words + [self._vocab_dict.unk for _ in range(padding_length)]

self._input.append(id_words)
self._output.append(id_label)
# convert to numpy array
self._input = np.asarray(self._input, dtype=np.int32)
self._output = np.asarray(self._output, dtype=np.int32)

self._input中存储编码后的每一条内容,self._output中存储编码后的每一条对应的类别。特别说明,因为实际每条编码后的记录长度都不同,有的长,有的短。所以在代码中self._encoded_length表示每条记录保留多少个词。长的切去,短的用-1补全。

额外地对self._inputself._output做一个随机洗牌操作:

1
2
3
p = np.random.permutation(len(self._input))
self._input = self._input[p]
self._output = self._output[p]

这个操作使每个batch中数据分布尽可能一致,尽可能可以代表整个数据集的分布

第二步,生成batch。其过程如下图:

洗牌后继续取下一个batch

当图中最后的数据#*不足一个batch时,所有数据随机洗牌,这样就可以再得到一个batch。当然最后一个batch中有部分重复使用,这没关系。 代码实现如下:

1
2
3
4
5
6
7
8
9
10
11
12
13
14
15
16
17
18
19
def next_batch(self, batch_size):
"""
get next batch data
:param batch_size:
:return: the next batch of input and output
"""
end_indicator = self._indicator + batch_size
if end_indicator > len(self._input):
self._random_shuffle()
self._indicator = 0
end_indicator = batch_size
if end_indicator > len(self._input):
raise Exception("batch size : %d is too large" % batch_size)

batch_input = self._input[self._indicator: end_indicator]
batch_ouput = self._output[self._indicator: end_indicator]
self._indicator = end_indicator
# return what we require
return batch_input, batch_ouput

测试:当_encoded_length为50,batch_size为2时,可能输出如下:

1
2
3
4
5
6
7
8
9
10
11
12
(array([[ 5639,  5529, 28692, 14277,   108,     0,   825,    87,  7763,
22153, 17930, 17, 250, 16, 156, 481, 456, 45,
6, 102, 45, 1, 5639, 20799, 30, 39057, 949,
3640, 22153, 92, 15, 5639, 30, 20562, 21187, 14,
3193, 18589, 30, 5529, 17, 24157, 0, 16, 831,
3810, 4, 4406, 2849, 3092],
[24102, 11066, 1375, 52, 7379, 224, 1027, 956, 2962,
17510, 17, 250, 16, 4, 138, 13230, 2, 10477,
1375, 21, 1, 13, 119, 406, 3380, 41, 1,
13230, 17, 1647, 16, 32614, 2, 0, 147, 216,
6, 5447, 5, 0, 136, 5, 8616, 5, 41351,
25425, 136, 5, 12401, 45]], dtype=int32), array([1, 4], dtype=int32))

两条记录,第一条记录的类别为1,另一条的类别为4。

整个过程完整代码看这里。数据准备完成,便可以用于训练模型了。

文本分类(二)-文本预处理I-词频统计

文本数据与图像数据本质一样,图像本身的每个通道,像素点值就是数据本身。而文本数据要被计算机理解,首先要被处理成数值型,也就是说需要给文本编码,如embedding。这篇笔记记录将文本数值化

实例

一个样本文件有5000条记录,存在于txt中。如下为样本文本中的索引为204的记录:

1
2
3
4
with open(train_file, 'r') as f:
lines = f.readlines()
print(len(lines))
print(lines[204])

输出:

1
2
5000
体育 绿衫军vs热火首发:新老三巨头对抗 小奥单挑大Z新浪体育讯北京时间5月4日,热火和凯尔特人迎来第二回合巅峰对决,本场比赛双方主帅均未对首发名单做出任何更改。而凯尔特人主帅道格-里弗斯赛前也向媒体表示,本场比赛“大鲨鱼”沙奎尔-奥尼尔将继续作壁上观,以下为双方首发名单——凯尔特人:隆多、雷-阿伦、皮尔斯、加内特、杰梅因-奥尼尔热火:毕比、韦德、詹姆斯、波什、伊尔戈斯卡斯(小林)

格式是:类别+样本描述。

分成label和content:

1
label, content = lines[204].strip('\r\n').split('\t')

分词

使用jieba对content进行分词:

1
2
3
4
5
6
7
8
9
word_iter = jieba.cut(content)

word_content = '' # 保存每一个词
for word in word_iter: # 对切分结果中每个词作如下操作
word = word.strip(' ')
if word != '':
word_content += word + ' '
out_line = '%s\t%s\n' % (label, word_content.strip(' '))
print(out_line)

写入文件的每一条数据格式:

1
体育	vs 热火 首发 : 新 老三 巨头 对抗 小奥 单挑 大 Z 新浪 体育讯 北京 时间 5 月 4 日 , 热火 和 凯尔特人 迎来 第二 回合 巅峰 对决 , 本场 比赛 双方 主帅 均 未 对 首发 名单 做出 任何 更改 。 而 凯尔特人 主帅 道 格 - 里 弗斯 赛前 也 向 媒体 表示 , 本场 比赛 “ 大 鲨鱼 ” 沙奎尔 - 奥尼尔 将 继续 作壁上观 , 以下 为 双方 首发 名单 — — 凯尔特人 : 隆多 、 雷 - 阿伦 、 皮尔斯 、 加内特 、 杰 梅因 - 奥尼尔 热火 : 毕比 、 韦德 、 詹姆斯 、 波什 、 伊尔 戈斯卡 斯 ( 小林 )

如上述过程将源文件中每一条记录执行此操作后写入目标文件。整理成函数:

1
2
3
4
5
6
7
8
9
10
11
12
13
14
15
16
17
18
19
20
21
def generate_seg_file(input_file, output_seg_file):
"""对input_file内容分词"""
with open(input_file, 'r') as f: # 读文件
lines = f.readlines()
with open(output_seg_file, 'w') as f: # 写的方式打开写文件
for line in lines: # 对于每一行
label, content = line.strip('\r\n').split('\t') # 分出lenbel和content
word_iter = jieba.cut(content) # 对content切分成词
word_content = '' # 保存每个次
for word in word_iter: # 对切分结果中每个词作如下操作:
word = word.strip(' ')
if word != '':
word_content += word + ' '
out_line = '%s\t%s\n' % (label, word_content.strip(' ')) # 输入文件每一行的格式

f.write(out_line) # 写入文件

# 对三个数据集作同样操作
generate_seg_file(train_file, seg_train_file)
generate_seg_file(val_file, seg_val_file)
generate_seg_file(test_file, seg_test_file)

此时三个样本集各自的分词结果。

统计词频

对上一步得到的分词后的文件进行词频统计。如对索引为204的记录统计:

1
2
3
4
5
6
7
8
9
with open(output_seg_file, 'r') as f:
lines = f.readlines()

word_dict = {}
label, content = lines[204].strip('\r\n').split('\t')
for word in content.split():
word_dict.setdefault(word, 0)
word_dict[word] += 1
print(word_dict)

结果为:

1
{'绿衫': 1, '军': 1, 'vs': 1, '热火': 3, '首发': 3, ':': 3, '新': 1, '老三': 1, '巨头': 1, '对抗': 1, '小奥': 1, '单挑': 1, '大': 2, 'Z': 1, '新浪': 1, '体育讯': 1, '北京': 1, '时间': 1, '5': 1, '月': 1, '4': 1, '日': 1, ',': 4, '和': 1, '凯尔特人': 3, '迎来': 1, '第二': 1, '回合': 1, '巅峰': 1, '对决': 1, '本场': 2, '比赛': 2, '双方': 2, '主帅': 2, '均': 1, '未': 1, '对': 1, '名单': 2, '做出': 1, '任何': 1, '更改': 1, '。': 1, '而': 1, '道': 1, '格': 1, '-': 4, '里': 1, '弗斯': 1, '赛前': 1, '也': 1, '向': 1, '媒体': 1, '表示': 1, '“': 1, '鲨鱼': 1, '”': 1, '沙奎尔': 1, '奥尼尔': 2, '将': 1, '继续': 1, '作壁上观': 1, '以下': 1, '为': 1, '—': 2, '隆多': 1, '、': 8, '雷': 1, '阿伦': 1, '皮尔斯': 1, '加内特': 1, '杰': 1, '梅因': 1, '毕比': 1, '韦德': 1, '詹姆斯': 1, '波什': 1, '伊尔': 1, '戈斯卡': 1, '斯': 1, '(': 1, '小林': 1, ')': 1}

此字典中键为词语,值为键出现的频数。当然这只是对一条记录的统计,对所有记录统计才有意义。

按词语频数排序,方便之后输入模型的截取操作。****

1
2
3
sorted_word_dict = sorted(
word_dict.items(), key = lambda d:d[1], reverse=True)
print(sorted_word_dict)

结果:

1
[('、', 8), (',', 4), ('-', 4), ('热火', 3), ('首发', 3), (':', 3), ('凯尔特人', 3), ('大', 2), ('本场', 2), ('比赛', 2), ('双方', 2), ('主帅', 2), ('名单', 2), ('奥尼尔', 2), ('—', 2), ('绿衫', 1), ('军', 1), ('vs', 1), ('新', 1), ('老三', 1), ('巨头', 1), ('对抗', 1), ('小奥', 1), ('单挑', 1), ('Z', 1), ('新浪', 1), ('体育讯', 1), ('北京', 1), ('时间', 1), ('5', 1), ('月', 1), ('4', 1), ('日', 1), ('和', 1), ('迎来', 1), ('第二', 1), ('回合', 1), ('巅峰', 1), ('对决', 1), ('均', 1), ('未', 1), ('对', 1), ('做出', 1), ('任何', 1), ('更改', 1), ('。', 1), ('而', 1), ('道', 1), ('格', 1), ('里', 1), ('弗斯', 1), ('赛前', 1), ('也', 1), ('向', 1), ('媒体', 1), ('表示', 1), ('“', 1), ('鲨鱼', 1), ('”', 1), ('沙奎尔', 1), ('将', 1), ('继续', 1), ('作壁上观', 1), ('以下', 1), ('为', 1), ('隆多', 1), ('雷', 1), ('阿伦', 1), ('皮尔斯', 1), ('加内特', 1), ('杰', 1), ('梅因', 1), ('毕比', 1), ('韦德', 1), ('詹姆斯', 1), ('波什', 1), ('伊尔', 1), ('戈斯卡', 1), ('斯', 1), ('(', 1), ('小林', 1), (')', 1)]

整理成函数,对所有记录统计。注意该操作只针对训练集

1
2
3
4
5
6
7
8
9
10
11
12
13
14
15
16
17
18
19
20
def generate_vocab_file(input_seg_file, output_vocab_file):
"""将input_seg_file中做词频统计,输出到out_put_file中"""
with open(input_seg_file, 'r') as f:
lines = f.readlines()
word_dict = {}
for line in lines:
label, content = line.strip('\r\n').split('\t')
for word in content.split():
word_dict.setdefault(word, 0)
word_dict[word] += 1
# [(word, frequency), ..., ()]
sorted_word_dict = sorted(
word_dict.items(), key = lambda d:d[1], reverse=True)
with open(output_vocab_file, 'w') as f:
f.write('<UNK>\t10000000\n') # 当在测试集中找不到一个词时,用<UNK> 代替
for item in sorted_word_dict:
f.write('%s\t%d\n' % (item[0], item[1]))

# 只对已知的训练集执行此操作
generate_vocab_file(seg_train_file, vocab_file)

打开结果文件vocab_file查看:

1
2
3
4
5
6
7
8
9
10
11
12
13
14
15
16
17
18
19
20
21
22
23
24
1 <UNK>   10000000
21871208
31390830
4822140
5303879
6258508
7248160
8240938
...
508 同样 5874
509 正式 5868
510 故事 5867
511 13 5855
512 建筑 5854
513 代表 5850
514 主持人 5843
515 水平 5833
...
359234 各偏 1
359235 1.8782 1
359236 1.0307 1
359237 0.763 1
359238 87.82% 1
359239 0.5376 1

第一列为序号,表示第几个词,第二列为词(出现的数组和百分比都是文本中的实际数字),第三列为该词出现的频数。两点说明:

  • 频数太小的词无意义,因为神经网络为概率模型,只出现一次没有统计意义
  • 频数很高但通用的词(停用词)同样无意义,因为通用的词在分类问题中不能提供有用信息,从信息论角度看,使用通用词训练模型不能减少模型的不确定性。这两点之后会处理。

对label统计:

1
2
3
4
5
6
7
8
9
10
11
12
13
14
15
16
17
def generate_category_dict(input_file, category_file):
"""统计类别"""
with open(input_file, 'r') as f:
lines = f.readlines()
category_dict = {}
for line in lines:
label, content = line.strip('\r\n').split('\t')
category_dict.setdefault(label, 0)
category_dict[label] += 1
category_number = len(category_dict)
with open(category_file, 'w') as f:
for category in category_dict:
line = '%s\n' % category
print('%s\t%d' % (category, category_dict[category]))
f.write(line)

generate_category_dict(train_file, category_file)

结果写入catecory_file, 并且控制台输出:

1
2
3
4
5
6
7
8
9
10
体育	5000
娱乐 5000
家居 5000
房产 5000
教育 5000
时尚 5000
时政 5000
游戏 5000
科技 5000
财经 5000

类别频数相同,表示这是一个极度均匀数据集。这是理想的!

统计词的频率,是为了截取,每个词的数值化,可用其序号代替。

整个过程生产5个文件:

  • seg_train_file: 分词后的训练集
  • seg_val_file: 分词后的验证集
  • seg_test_file: 分词后的测试集
  • vocab_file: 训练集的词频统计
  • category_file: 训练集的类别统计

完整程序与数据文件这里

敲黑板对于如本笔记所处理的极度均匀的数据集,评价模型时可以使用准确率。但是对于极度偏斜(Skewed Data)的数据,如在数据集中某类病症的发病样本数与未发病样本书之比远小于1,只使用准确率评价模型是远远不够的。这时就需要使用其他模型评估方法如混淆矩阵(Confusion Matrix)等。

LeetCode-方法论-Floyd's Algorithm

这篇笔记记录Floyd算法,及若干与之相关的Leetcode问题。体会本题是怎样将问题转化的。当原问题棘手时,找到合适的方向可以转化为简单问题。

#141 Linked List Cycle

  • 描述

    1
    2
    3
    Input: head = [3,2,0,-4], pos = 1
    Output: true
    Explanation: There is a cycle in the linked list, where tail connects to the second node.
  • 思路

    如果存在环,兔子与乌龟会第二次相遇;否则除了起点,龟兔不会再相遇。

  • 实现

    1
    2
    3
    4
    5
    6
    7
    8
    9
    10
    11
    12
    13
    14
    15
    16
    bool hasCycle(ListNode* head){
    if(!head) return false;
    ListNode* rabbit=head;
    ListNode* turtle=head;


    while(rabbit && turtle){
    rabbit = rabbit->next;
    turtle = turtle->next;

    if (rabbit) rabbit=rabbit->next; // one step faster than the turtle
    if (rabbit && (rabbit==turtle))
    return true;
    }
    return false;
    }

#287 Find the Duplicate Number

  • 描述

    1
    2
    3
    4
    5
    6
    7
    8
    9
    10
    Input: [3,1,3,4,2]
    Output: 3
    Note:

    You must not modify the array (assume the array is read only).
    You must use only constant, O(1) extra space.
    Your runtime complexity should be less than O(n2).
    There is only one duplicate number in the array, but it could be repeated more than once.

    依照本题意,数组中一定有重复元素,找到数组中重复出现的元素。
  • 思路

    就题意而言,数组元素唯一和数组元素有重复的区别可用下图表示:

    1) 当给定数组中无重复元素时,如nums={3,4,5,2,1}。以第一行为当前位置,第二行为下一位置。小人从位置0开始走最终走到5停止。

    路经无环

    2) 当给定数组中有重复元素时,如nums={1,4,6,5,6,2,3}。小人从位置0开始走,路经有环始终不会停止。而且被两个箭头指向的节点6为重复元素。

    路经有环
  • 实现

    1
    2
    3
    4
    5
    6
    7
    8
    9
    10
    11
    12
    13
    14
    15
    16
    int findDuplicate(vector<int>& nums) {
    int turtle = nums[0];
    int rabbit = nums[0];
    do{
    turtle = nums[turtle]; // one step
    rabbit = nums[nums[rabbit]]; // two steps
    }while(turtle != rabbit);

    int ptr1 = nums[0];
    int ptr2 = turtle;
    while(ptr1 != ptr2){
    ptr1 = nums[ptr1];
    ptr2 = nums[ptr2];
    }
    return ptr1;
    }

    当龟兔位于同起点,向相同的方向跑,如果赛道无环,乌龟永远追不上兔子。若赛道有环,兔子会再次追上乌龟。这就是Floy’s 算法的来源。

    表面上与龟兔赛跑无关,在逻辑上构建出类似链表后,就水到渠成了。

    本题并不复杂,但当经过转化后时间空间复杂度达到若干方法中较优。时刻有转化问题的意识。

关键:问题转化龟兔赛跑

文本分类(一)-几类模型

文本分类任务中,输入为一条由词语组成的文本,模型判断这条文本的类别。

1.基本文本模型

模型一:使用RNN(LSTM)的最后一个状态判断类别,是最基本的RNN模型。如图:

<>pic<>

LSTM的最后一个状态,或者说是该LSTM结点的最后一个time step 包含了整个句子的信息。将这个信息传入一个普通的全连接的神经网络。最终得到一个分类。比如一个句子传入模型后被判断为威胁类别。如果是二分类,使用sigmoid实现,若是多分类,使用softmax实现。

这个过程中涉及到embedding,就是用向量来表示一个词语,或者说是对词语的进一步编码。第一次编码是将词语转化为数字,两者一一对应。

不使用one-hot 编码,深度学习领域使用embedding的方式对词语进行编码。具体如何做,如下:

词语 id1 id2 id3 id4 id5
海洋 0.11 0.52 0.45 1.27 0.72
阳光 0.63 0.24 1.12 0.27 1.27
冲浪 0.72 0.22 0.23 0.37 0.46

我把每一个出现了的词用长度为5的向量表示。并且embedding中的数值是变量,在训练模型时,所有数值是要被学习(更新)的。从而使得每个词语对应的向量与词语意思更相关。

当把输入编码成一个向量时,过程就更类似对图像的处理了(两者还是很不一样)。输入与输出都是向量。

2.双向文本模型

上述基本模型有个问题:虽然LSTM可以选择性地保存信息,但是,随后一个词语还是会与其较近的词语由更大的关系,而弱化较早以前的词语。所以更早些的信息可能不会被保存下来。双向RNN就是用来解决这个问题的,如图:

<>pic<>

特点:

  • 信息正向传播,并且逆向传播。
  • 把每一个词语经过这个LSTM的输出,做组合(拼接,pooling等)
  • 最终将组合结果传入一个全连接层

3.HAN

特点:

  • 分层,第一层词语编码,第二层句编码。
  • 每一层增加一个类似LSTM内部门的操作,成为Attention 机制

4.CNN解决文本问题

组成原理-缓存置换算法

这篇笔记记录了4种缓存置换算法

  • 随机置换算法
  • FIFO
  • LRU
  • LFU

FIFO(先进先出算法)

原理:置换缓存时,从硬件角度:当缓存不满时,直接添加所需内容,否则,将最先进入缓存的内容删除,并把需使用的内容添加到缓存。对应的逻辑角度:当缓存不满时,直接添加新节点到链表尾。若缓存满,先将链表头节点删除,并且把新的节点连接到链表尾部。

实现:缓存使用双向链表实现DoubleLinkedList,其中节点由Node实现。

1
2
3
4
5
6
7
8
9
10
11
12
13
14
15
16
17
18
19
20
21
22
23
24
25
26
27
28
29
30
31
32
33
34
35
36
37
38
from DoubleLinkedList import Node, DoubleLinkedList


class FIFO(object):
def __init__(self, capacity):
self.capacity = capacity
self.size = 0
self.map = {} # {key: node} as search table
self.dlist = DoubleLinkedList(self.capacity) # as the cache

def get(self, key):
if key not in self.map:
return -1
else:
node = self.map.get(key)
return node.value

def put(self, key, value):
if self.capacity == 0:
return

if key in self.map: # if this key exist in map
node = self.map.get(key) # get this key
self.dlist.remove(node) # remove the node with this key
node.value = value # update the value of that node
self.dlist.append(node) # add node to the tail
else:
if self.size == self.capacity: # if cache is full
node = self.dlist.pop()
del self.map[node.key] # delete the node at the head
self.size -= 1
node = Node(key, value)
self.dlist.append(node) # add new node to the tail
self.map[key] = node
self.size += 1

def print(self):
self.dlist.print()

测试:

1
2
3
4
5
6
7
8
9
10
11
12
13
14
15
16
17
18
19
if __name__ == '__main__':
cache = FIFO(4)
cache.put(1, 10)
cache.put(2, 20)
cache.put(3, 30)
cache.print()
cache.put(1, 12)
cache.print()
print("------")
cache.put(4, 40)
cache.print()
cache.put(5, 50)
cache.print()
cache.put(1, 11)
cache.print()
cache.put(3, 30)
cache.print()
print(cache.get(1))
print(cache.get(2))

结果如下,注释体现了FIFO算法过程

1
2
3
4
5
6
7
8
9
{1: 10}->{2: 20}->{3: 30}            // 该时刻的缓存内容
{2: 20}->{3: 30}->{1: 12} // 缓存未满,key=1的接点在缓存中,删除头部key=1的{1: 10},尾部加入{1: 12}
------
{2: 20}->{3: 30}->{1: 12}->{4: 40} // 缓存未满,key=4的节点不存在,所以在尾部加{4: 40}
{3: 30}->{1: 12}->{4: 40}->{5: 50} // 缓存满,key=5的节点不存在,删除头部{2: 20},尾部加{5: 50}
{3: 30}->{4: 40}->{5: 50}->{1: 11} // 缓存满,key=1的节点在缓存中,删除key=1的{1: 12},尾部加{1: 11}
{4: 40}->{5: 50}->{1: 11}->{3: 30} // 同理
11 // 查找key=1的value,存在
-1 // 查找key=2的value,不存在

LRU(最不经常使用算法)

待填坑

LFU(最近最少使用算法)

待填坑

附录

Node定义

1
2
3
4
5
6
7
8
9
10
11
12
13
14
class Node:
def __init__(self, key, val):
self.key = key
self.value = val
self.prev = None
self.next = None

def __str__(self):
val = '{%d: %d}' % (self.key, self.value)
return val

def __repr__(self):
val = '{%d: %d}' % (self.key, self.value)
return val

双向链表DoubleLinkedList定义

对于成员函数为什么返回看似无用的node节点,经验上讲这样做是最优的。在FIFO的实现过程中会发现,如果成员函数返回其他内容,或无返回值,最终的应用回出现逻辑错误。

1
2
3
4
5
6
7
8
9
10
11
12
13
14
15
16
17
18
19
20
21
22
23
24
25
26
27
28
29
30
31
32
33
34
35
36
37
38
39
40
41
42
43
44
45
46
47
48
49
50
51
52
53
54
55
56
57
58
59
60
61
62
63
64
65
66
67
68
69
70
71
72
73
74
75
76
77
78
79
80
81
82
83
84
85
86
87
88
89
90
91
92
93
94
95
96
97
98
99
100
101
102
103
104
105
106
107
108
109
class DoubleLinkedList:
def __init__(self, cap=0xffff):
self.capacity = cap
self.head = None
self.tail = None
self.size = 0

# add node from head
def __add_head(self, node):
if not self.head:
self.head = node
self.tail = node
self.head.next = None
self.head.prev = None
else:
self.head.prev = node
node.next = self.head
self.head = node
self.head.prev = None
self.size += 1
return node

# append node to the tail
def __add_tail(self, node):
if not self.tail:
self.head = node
self.tail = node
self.tail.next = None
self.tail.prev = None
else:
self.tail.next = node
node.prev = self.tail
self.tail = node
self.tail.next = None

self.size += 1
return node

# delete tail
def __del_tail(self):
if not self.tail:
return
node = self.tail
if node.prev:
self.tail = node.prev
self.tail.next = None
node.prev = None
else:
self.tail = self.head = None
self.size -= 1
return node

# delete head
def __del_head(self):
if not self.head: # if empty list
return
node = self.head # assign self.head to a new node
if node.next:
self.head = node.next
self.head.prev = None
node.next = None
else: # only a head exist
self.head = self.tail = None
self.size -= 1
return node

# remove node in any position
def __remove(self, node):
# if node==None, remove tail by default
if not node:
node = self.tail
if node == self.tail:
self.__del_tail()
elif node == self.head:
self.__del_head()
else:
node.prev.next = node.next
node.next.prev = node.prev
self.size -= 1
return node

# APIs
# pop node from head
def pop(self):
return self.__del_head()

# add node to the tail
def append(self, node):
return self.__add_tail(node)

# add node to the head
def append_head(self, node):
return self.__add_head(node)

# remove
def remove(self, node=None):
return self.__remove(node)

def print(self):
p = self.head
line = ''
while p:
line += '%s' % p
p = p.next
if p:
line += '->'
if not line:
print("empty double linked list")
print(line)

MobileNet深度可分离卷积

这篇笔记记录MobileNet的深度可分离卷积操作的特点及实现。

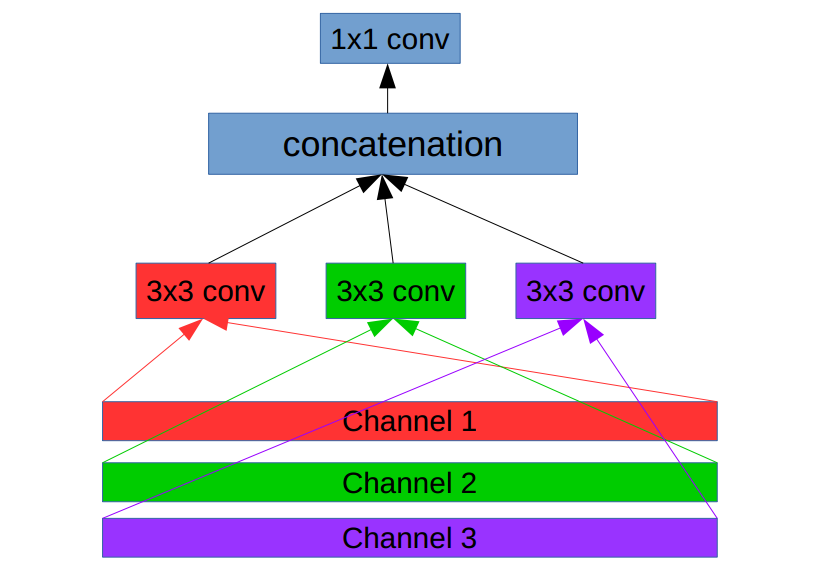
深度可分离卷积是将输入的每个通道展开,在单个通道上做卷积,最后将结果合并。换句话说,通常的卷积层每个核要扫描输入的所有通道,而深度可分离卷积每个核只读输入的一个通道。与Inception 的分组卷积单元相似,不同的是每个卷积核只对输入的一个通道操作。

深度可分离卷积结构

假设深度可分离层的输入有3个通道,如图表示了该模块的过程:

对每个通道进行卷及操作

下面是就上图结构实现的模块:

实现

1
2
3
4
5
6
7
8
9
10
11
12
13
14
15
16
17
18
19
20
21
22
23
24
25
26
27
28
29
30
31
32
33
34
35
36
37
38
39
def separable_conv_block(x, output_channel_number, name):
"""
x: input
output_channel_number: the output channel of the entire block,
又是1x1卷据层的卷积核个数(卷积核个数==输出通道数)
name: namespace
"""
with tf.variable_scope(name):
# get channel number:
input_channel = x.get_shape().as_list()[-1]

# split channels to a channel list:
# channel_wise_x: [channel1, channel2, ...]
channel_wise_x = tf.split(x, input_channel, axis = 3)

# 对每一个通道分别执行3x3的卷积操作
output_channels = []
for i in range(len(channel_wise_x)):
output_channel = tf.layers.conv2d(channel_wise_x[i],
1,
(3, 3),
strides = (1,1),
padding = 'same',
activation = tf.nn.relu,
name = 'conv_%d' % i)
output_channels.append(output_channel)

# concat along channel(index=3)
concat_layer = tf.concat(output_channels, axis = 3)

# 经过一个1x1的卷积操作
conv1_1 = tf.layers.conv2d(concat_layer,
output_channel_number,
(1,1),
strides = (1,1),
padding = 'same',
activation = tf.nn.relu,
name = 'conv1_1')
return conv1_1

将上述模块放入MobileNet的网络结构就可以搭建完整的MobileNet。实例实现看这里


Google Inception Net-分组卷积单元(Inception Module)

这篇笔记记录Inception Net的分组卷积操作及Inception Module的作用及实现。

Google Inception Net V1首次出现在2014年,其有网络结构有22层,比同年出现的VGGNet的19层更深。Inception Net有一下特点:

  • 同一层上使用多种卷积核
  • 卷积核大小较小,通常只使用1x1,3x3,5x5的尺寸

Inception Module结构

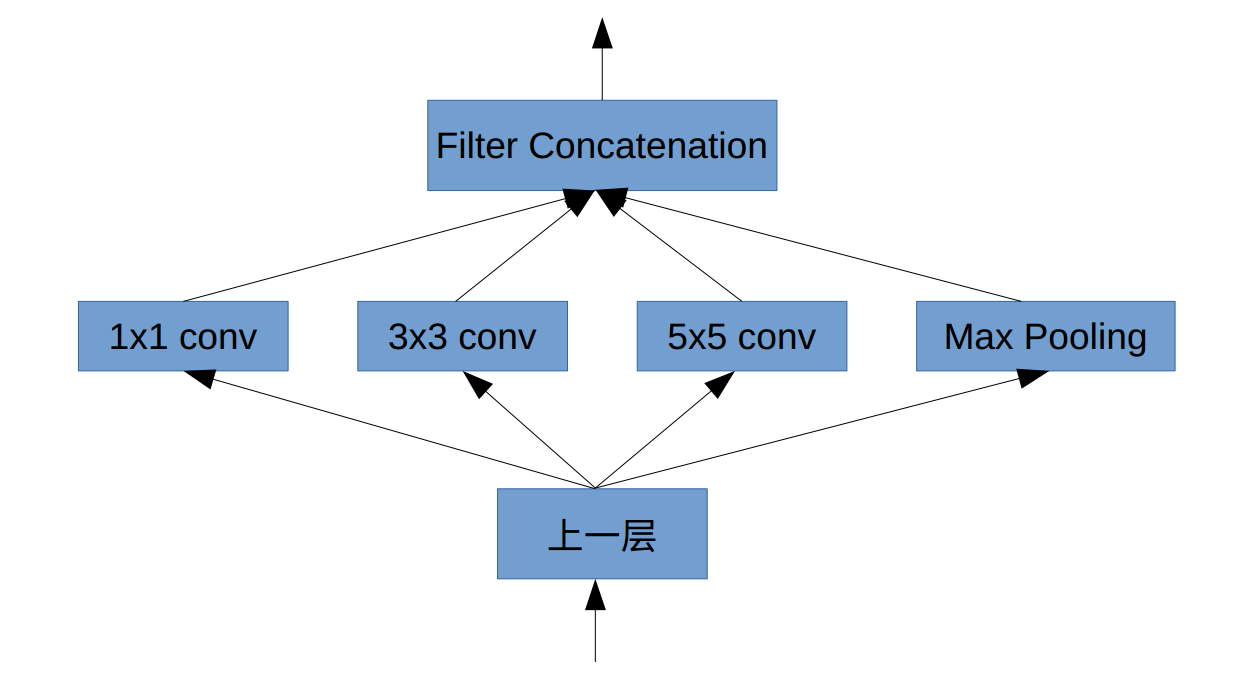
其核心是分组卷积,即同一层上使用多种尺寸的卷积核,每一个卷积核得到同一层上不同尺度的特征。不同组之间的特征不交叉计算,如此便减少了计算量。

多用小尺寸的卷积核,尤其是多次用到1x1的。这是因为1x1的核性价比很高,即消耗很少的计算量就可以增加一层非线性变换
如下图所示,实际会更灵活:

分别使用1x1, 3x3, 5x5的卷积核采样。

实现

以下是根据上图的分组卷积结构而实现的python代码:

1
2
3
4
5
6
7
8
9
10
11
12
13
14
15
16
17
18
19
20
21
22
23
24
25
26
27
28
29
30
31
32
33
34
35
36
37
38
39
40
41
42
43
44
45
46
47
def inception_block(x, output_channel_for_each_path, name):
with tf.variable_scope(name): # avoid name conflict
conv1_1 = tf.layers.conv2d(x,
output_channel_for_each_path[0],
(1, 1), # 1x1 卷积核
strides = (1,1),
padding = 'same',
activation = tf.nn.relu,
name = 'conv1_1')
conv3_3 = tf.layers.conv2d(x,
output_channel_for_each_path[1],
(3, 3), #3x3 卷积核
strides = (1,1),
padding = 'same',
activation = tf.nn.relu,
name = 'conv3_3')
conv5_5 = tf.layers.conv2d(x,
output_channel_for_each_path[2],
(5, 5), # 5x5 卷积核
strides = (1,1),
padding = 'same',
activation = tf.nn.relu,
name = 'conv5_5')
max_pooling = tf.layers.max_pooling2d(x,
(2, 2),
(2, 2),
name = 'max_pooling')

# max_pooling: output = 1/2 input, so need to add 0;
max_pooling_shape = max_pooling.get_shape().as_list()[1:] # size of the output
input_shape = x.get_shape().as_list()[1:] # size of the input

width_padding = (input_shape[0] - max_pooling_shape[0]) // 2 # pad to width
height_padding = (input_shape[1] - max_pooling_shape[1]) // 2 #pad to height


padded_pooling = tf.pad(max_pooling,
[[0, 0],
[width_padding, width_padding],
[height_padding, height_padding],
[0, 0]])

# put together all pieses
concat_layer = tf.concat(
[conv1_1, conv3_3, conv5_5, padded_pooling],
axis = 3)
return concat_layer

以上代码片段实现的是Inception V1实际会更灵活。到了Inception V2,用两个3x3代替5x5的卷积核。到了V3,将较大的二维卷积拆成一维卷积,比如将7x7的拆成1x77x1两个卷积。到了V4 模型结合了ResNet的残差学习块

本笔记记录了分组卷积的作用及实现,完整的Inception Net实现看这里


ResNet 残差学习单元(Residual Unit)

这篇笔记记录残差学习块(Residual Unit)的作用及实现。

ResNet(Residual Neural Network)是在2015年提出,其对于之前的深层网络对大特点是其结构中的残差学习块。

在网络不断加深的过程中会出现Degradation的现象,也就是说再持续增加网络的深度导致准确率下降。ResNet的灵感源于:一个比较浅的网络达到饱和准确率后,在其后加上几个y=x全等映射层,至少不会使误差增加

Residual Unit

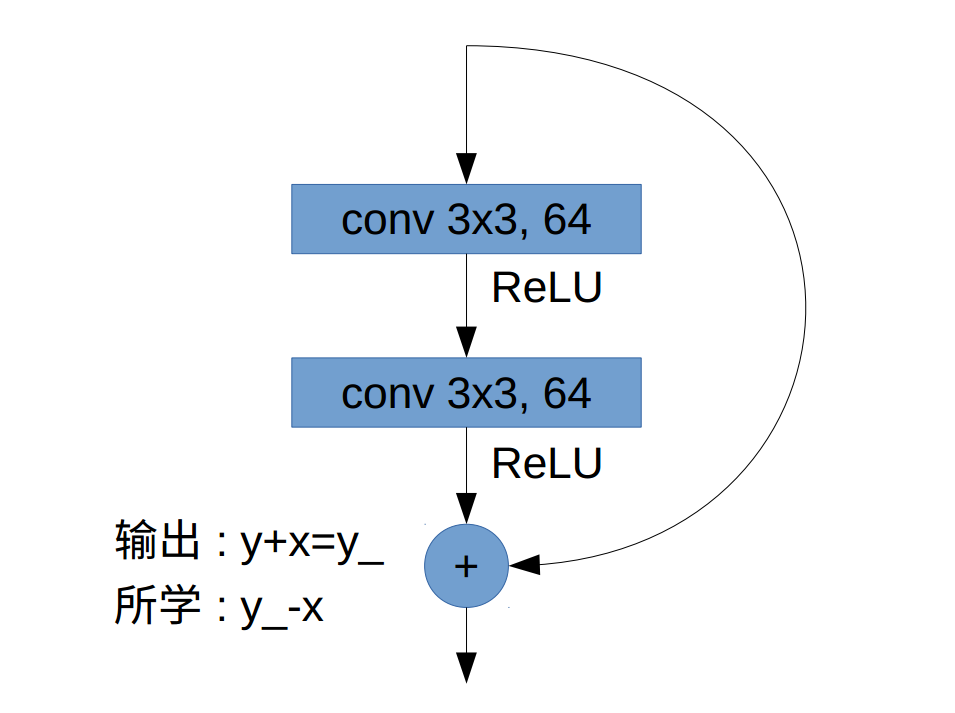
假设有一段网络的输入是x,它回经过若干层非线性变换得到结果y,假设其期望输出为y_,同时x也作为输出的一部分加在y中。那么网络的学习目标是y_-x。ResNet相当于改变了学习的目标,它不再是完整的输出y_, 而是输出与输入的差y_-x,也就是Residual(残差)。如下图:

图中x为此残差块的输入,y_为期望输出,y为经过两个卷积层的输出。

为什么ResNet回会有效,可以这样理解:传统的卷积层或全连接层在信息传递时,或多或少存在信息丢失的问题,ResNet从一些程度上解决了这个问题,它通过直接将输入加到输出上,保护了信息的完整性。

实现

1
2
3
4
5
6
7
8
9
10
11
12
13
14
15
16
17
18
19
20
21
22
23
24
25
26
27
28
29
30
31
32
33
34
35
36
37
38
39
40
41
42
43
44
def residual_block(x, output_channel):
"""residual connection implementation"""
input_channel = x.get_shape().as_list()[-1]
if input_channel * 2 == output_channel: #如果本层的输出通道数是输入通道数的2倍
increase_dim = True
strides = (2, 2)
elif input_channel == output_channel: #如果本层的输出通道数与输入通道数相同
increase_dim = False
strides = (1, 1)
else:
raise Exception("input channel can't match output channel")
conv1 = tf.layers.conv2d(x,
output_channel,
(3,3),
strides = strides,
padding = 'same',
activation = tf.nn.relu,
name = 'conv1')
conv2 = tf.layers.conv2d(conv1,
output_channel,
(3, 3),
strides = (1, 1),
padding = 'same',
activation = tf.nn.relu,
name = 'conv2')
# 如果通道数翻倍了
if increase_dim:
# [None, image_width, image_height, channel] -> [,,,channel*2]
pooled_x = tf.layers.average_pooling2d(x,
(2, 2),
(2, 2),
padding = 'valid')
# 使padded_x 与 conv2 大小相同
padded_x = tf.pad(pooled_x,
[[0,0],
[0,0],
[0,0],
[input_channel // 2, input_channel // 2]])
# 如果通道数未翻倍
else:
padded_x = x # 全等映射

output_x = conv2 + padded_x
return output_x

本笔记只是记录了残差学习块的作用及实现,完整的ResNet实现看这里

CXX可调用对象

这篇笔记记录function模板与含有相同调用形式的可调用对象。

c++中有一些可调用对象

  • 函数
  • 函数指针
  • lambda
  • bind创建的对象
  • 重载了函数调用运算符的类

比如下面三个函数add, mod, divide

1
2
3
4
5
6
7
8
9
10
11
12
13
14
15
16
17
#include <iostream>
#include <functional>
#include <unordered_map>
using namespace std;

//一般函数
int add(int a, int b){ return a+b; }

//命名的lambda函数
auto mod = [](int a, int b){ return a%b; };

//重载了调用运算符的类,又称作函数对象
struct divide{
int operator()(int denomenator, int divisor){
return denomenator/divisor;
}
};

三个不同可调用对象:普通函数add,命名了的lambda对象mod,函数对象(function object)divide 拥有相同的调用形式(call signature).

1
int (int, int)   //表示传入两个int型,返回一个int型

而模板类function使用时需要指定类型,如上述调用形式。如此可以定义多个function对象

1
2
3
4
5
6
7
8
9
10
11
12
13
int main(int argc, char** argv){    
function<int(int, int) > f1 = add;
function<int(int, int) > f2 = divide();
function<int(int, int) > f3 = [](int a, int b){ return a%b; };
function<int(int, int) > f4 = mod;

cout<<f1(4,2)<<endl;
cout<<f2(4,2)<<endl;
cout<<f3(4,2)<<endl;
cout<<f4(4,2)<<endl;

return 0;
}

接下来, 可以构建从算数符号到函数的映射,如

1
2
3
4
5
6
7
8
9
10
11
12
13
//加入main中
unordered_map<string, function<int(int,int)>> calculator = {
{"+", add}, //函数指针
{"-", std::minus<int>()}, //STL函数
{"*", [](int a, int b){ return a*b; }}, //匿名lambda函数
{"/", divide()}, //函数对象
{"%", mod} }; //命名的lambda函数

calculator["+"](10,5);
calculator["-"](10,5);
calculator["*"](10,5);
calculator["/"](10,5);
calculator["%"](10,5);

如同vector<int>可以作为容器内容的类型,此处只不过用function<int(int,int)>作为了map的val类型。

结束
c++可调用对象

cmake编译工具及CMakeLists.txt的基本使用

这篇笔记记录了cmakeCMakeLists.txt的基本使用。不同于makecmake是一个跨平台的构建系统,cmake允许用户编写CMakeLists.txt来定义编译流程。确保系统已经安装了cmake

工程目录的一般结构如下:

1
2
3
4
5
6
7
8
projectName----build          //build中存放cmake执行后产生的中间文件
|--CMakeLists.txt
|--include
| |--func.h
|
|--src
|--func.cpp
|--main.cpp

对于上述目录结构,编写CMakeLists.txt如下即可

1
2
3
4
cmake_minimum_required(VERSION 3.5)
project(projectName)
set(CMAKE_CXX_STANDARD 11)
add_executable(projectName src/func.cpp src/main.cpp)

编译执行过程如下

1
2
3
4
$ cd build
build$ cmake .. //cmake指向CMakeists.txt所在的目录,生成makefile
build$ make //编译
build$ ./projectName //执行

补充

CMakeLists.txt是通过使用cmake命令生成MakeFile,之后使用make命令编译工程。