LeetCode-方法论-map&set-一

594, 349, 350, 1, 290, 205, 451, 202,

map包括有序map和无序map,set也分为有序set和无序set。
map由键值构成,set中元素无重复。

常用操作: find(), insert(), erase(), change(), search(),

#594 最长Harmonius 子序列

  • 描述

    1
    2
    3
    Input: [1,3,2,2,5,2,3,7]
    Output: 5
    Explanation: The longest harmonious subsequence is [3,2,2,2,3].
  • 思路:
    1) 第一步 将数组元素作为key,对应出现的次数作为val,放入map中。如下:

    map | 1st | 2nd | 3rd | 4th| 5th 
    -|-|-|-|-|-
    key | 1 | 2 | 3 | 5 | 7 |
    val | 1 | 3 | 2 | 1 | 1 |

    2) 遍历map:

    对于key=1,如果key=2存在,则子序列长度为: key=1的val + key=2的val: 1+3=4
    对于key=2,如果key=3存在,则子序列长度为: key=2的val + key=3的val: 3+2=5
    对于key=3,如果key=4不存在,continue
    对于key=5,如果key=6不存在,continue
    对于key=7,如果key=8不存在,continue
    最终返回最大值 5
  • 实现如下:

    1
    2
    3
    4
    5
    6
    7
    8
    9
    10
    11
    12
    13
    14
    15
    int findLHS(vector<int>& nums) {
    // create map
    map<int, int> mp;
    for (auto& item: nums)
    mp[item]++;

    // main process
    int res = 0;
    for (auto itr = mp.begin(); itr!=mp.end(); itr++){
    if ( mp.find(itr->first + 1) != mp.end()){
    res = max(res, mp[itr->first] + mp[itr->first+1]); // update max
    }
    }
    return res;
    }

#349 Intersection Of Two Arrays

  • 描述

    1
    2
    Input: nums1 = [4,9,5], nums2 = [9,4,9,8,4]
    Output: [9,4]
  • 逻辑

    第一步:将nums1中元素放入set中
    第二步:从set中查找nums2中每个元素,
        如果找到,就放入结果set中,如此一来,结果中也没有重复元素。
        如果没找到,continue。
  • 实现

    1
    2
    3
    4
    5
    6
    7
    8
    9
    10
    11
    12
    vector<int> intersection(vector<int>& nums1, vector<int>& nums2) {
    // 第一步
    set<int> record(nums1.begin(), nums1.end());

    set<int> resSet;
    // 第二步
    for (int i=0; i<nums2.size(); i++)
    if (record.find(nums2[i]) != record.end()) //in record
    resSet.insert(nums2[i]);

    return vector<int>( resSet.begin(), resSet.end() );
    }

#350 INtersection Of Two Arrays II

  • 描述

    1
    2
    Input: nums1 = [1,2,2,1], nums2 = [2,2]
    Output: [2,2]
  • 逻辑

    第一步:将nums1中元素放入map中
    第二步:遍历num2中每个元素:
        如果当前元素在map中的频数>0, 那么在结果vector中加入这个元素,同时map中这个元素的频数-1.
        如果当前元素在map中的频数==0,说明这个元素不是共有的,continue。
  • 实现

    1
    2
    3
    4
    5
    6
    7
    8
    9
    10
    11
    12
    13
    14
    15
    16
    vector<int> intersect(vector<int>& nums1, vector<int>& nums2) {
    // 第一步
    map<int, int> record;
    for (int i=0; i<nums1.size(); i++)
    record[nums1[i]] ++;

    // 第二步
    vector<int> resV;
    for (int i=0;i<nums2.size(); i++){
    if (record[nums2[i]] > 0){
    resV.push_back(nums2[i]);
    record[nums2[i]] -- ;
    }
    }
    return resV;
    }

#1 Two Sum

  • 描述

    1
    2
    3
    4
    5
    6
    7
    Given nums = [2, 7, 11, 15], target = 9,

    Because nums[0] + nums[1] = 2 + 7 = 9,
    return [0, 1].

    NOTE:You may assume that each input would have exactly one solution,
    and you may not use the same element twice.
  • 逻辑

    遍历nums中所有元素nums[i]:
        如果:map中没有找到target-nums[i]这个值,就把{nums[i], i}放入map中;
        如果:map中找到了target-nums[i],那么当前值index和target-nums[i]的index放入结果中。done
  • 实现

    1
    2
    3
    4
    5
    6
    7
    8
    9
    10
    11
    12
    13
    14
    vector<int> twoSum(vector<int>& nums, int target){
    std::unordered_map<int, int> record;
    for (int i=0;i<nums.size();i++){
    // nums[i] is not in the record
    if (record.find(target - nums[i]) == record.end()){
    record[nums[i]] = i;
    }
    else {// nums[i] is in the record
    int res[2] = {record[target-nums[i]], i};
    return vector<int>(res, res+2);
    }
    }
    throw invalid_argument("NO SOLUTION!");
    }

    敲黑板这个问题虽然简单,但有两点值得注意:
    元素逐个放入mapmap的value为index。相同的技巧,看#290.

#290 Word Pattern

  • 描述

    1
    2
    Input: pattern = "abba", str = "dog cat cat dog"
    Output: true
  • 逻辑 (不容易想到)

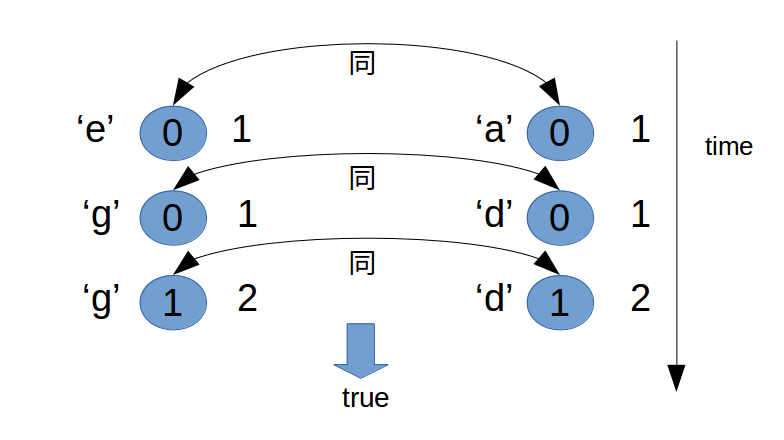
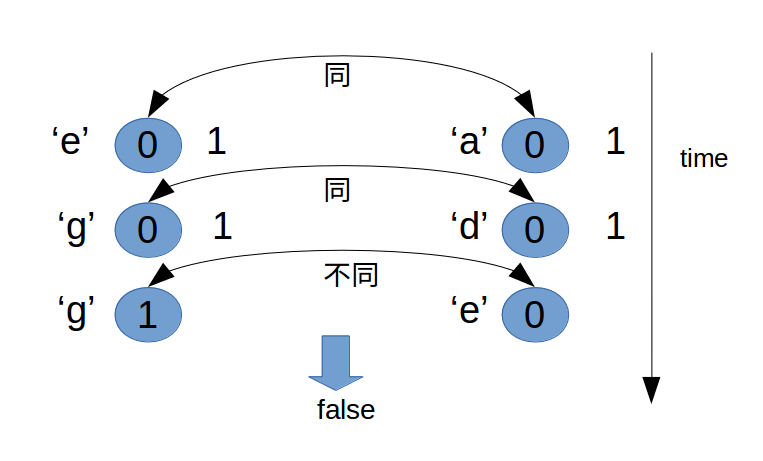
    要使用c++ 中 map容器的一个性质:”空的map中任何key对应的value都是0”。

    第一步:为两个input分别声明map。
    第二步:同步遍历pattern和str每一个元素:
        如果 两个map的key对应的value(index)相同,赋值给两个value为index+1;
        否则 返回false
    最终判断:最终的循环变量i是否等于input 的长度。
  • 实现

    1
    2
    3
    4
    5
    6
    7
    8
    9
    10
    11
    12
    13
    14
    15
    bool wordPattern(string pattern, string str) {
    map<char, int> mp1;
    map<string, int> mp2;

    // 从一个string中逐个读取单词
    istringstream in(str);
    int i = 0, n = pattern.size();
    for (string word; in >> word; ++i) {
    if (i == n || mp1[pattern[i]] != mp2[word])
    return false;
    mp2[word] = i + 1;
    mp1[pattern[i]] = i + 1;
    }
    return i == n;
    }

细节:从一个string中逐个读取单词。使用了c++中map的特性,考虑其他更通用的方法。

#205 Isomorphic Strings

  • 描述

    1
    2
    3
    4
    5
    Input: s = "egg", t = "add"
    Output: true

    Input: s = "foo", t = "bar"
    Output: false
  • 思路

    思路与#290相同。用图示表示出来:

    以 s = “egg”, t = “add” 为例:
    以 s = “egg”, t = “ade” 为例:
  • 实现

    1
    2
    3
    4
    5
    6
    7
    8
    9
    10
    11
    12
    bool isIsomorphic(string s, string t) {
    unordered_map<char, int> mpS;
    unordered_map<char, int> mpT;

    for (int i=0; i<s.size(); i++){
    if (mpS[s[i]] != mpT[t[i]])
    return false;
    mpS[s[i]]=i+1;
    mpT[t[i]]=i+1;
    }
    return true;
    }

敲黑板逐个放入map

#451 Sort Charactors By Frequency

  • 描述

    1
    2
    3
    4
    5
    Input:
    "aBbbccc"

    Output:
    "cccbbaB"
  • 逻辑

    很直接

    第一步:将string s中元素放入map中,并且把键值对作为元素翻入vector中。
    第二步:按value的大小从大到小排序。
    第三步:将vector中的元素放入结果string中。
  • 实现

    1
    2
    3
    4
    5
    6
    7
    8
    9
    10
    11
    12
    13
    14
    15
    16
    17
    18
    19
    20
    21
    22
    23
    24
    25
    struct cmpByValue {
    bool operator()(const pair<char, int>& l, const pair<char, int>& r){
    return l.second > r.second;
    }
    };

    string frequencySort(string s) {
    string res;
    // 第一步
    unordered_map<char, int> mp;
    for (int i=0; i<s.length(); i++)
    mp[s[i]] ++;

    // 第二步
    vector<pair<char, int>> mapValue(mp.begin(), mp.end());
    sort(mapValue.begin(), mapValue.end(), cmpByValue());

    // 第三步
    for (int i=0; i<mapValue.size(); i++){
    for (int j=0; j<mapValue[i].second; j++){
    res+=mapValue[i].first;
    }
    }
    return res;
    }

#202 Happy Number

  • 描述

    1
    2
    3
    4
    5
    6
    7
    8
    9
    Input: 19
    Output: true
    Explanation:
    1**2 + 9**2 = 82
    8**2 + 2**2 = 68
    6**2 + 8**2 = 100
    1**2 + 0**2 + 0**2 = 1

    Those numbers for which this process ends 1 are happy numbers.
  • 逻辑

    过程如描述中的Explanation。要注意的是,对于不是happy number的数,防止无限循环,将每一步的结果放入set中(不重复)。

  • 实现

    1
    2
    3
    4
    5
    6
    7
    8
    9
    10
    11
    12
    13
    14
    15
    16
    17
    18
    19
    20
    21
    int func(int n){
    int res = 0;
    while(n!=0){
    res+=pow(n % 10,2);
    n/=10; // 每次循环,从高高位到低位得到每一位的数值。
    }
    return res;
    }

    bool isHappy(int n) {
    unordered_set<int> record;
    while (1){
    if (n ==1) return true;

    record.insert(n);
    n = func(n);

    if (record.find(n) != record.end())
    return false;
    }
    }

CUDA-Nsight Eclipse Edition

Nsight 是一个开发CUDA程序的IDE和debug工具。

  1. 使用Nsight打开samples程序。
    选择“new”,“CUDA C/C++ Project”,给project命名,Project type 选择”Import CUDA Sample“。接下来从你的机器的samples install location中选择想要打开的project。如果机器上有CUDA-enabled GPU,接下来的设置默认就好。此时可以看到,.cu文件存在于project下的src文件中。这表示,如果自己新建的project也应个先create一个src文件夹,来存放所有源文件。

  2. 使用Nsight创建自己的project。
    如上述,只需在project type选择“Empty Project”。然后在这个project中 新建一个“Source Folder”,取名为src。最后就可以把所有的 .cu, .cuh, .cpp, .h 等源码文件在src中创建。

Nsight 的强大之处在于debug。它可以告诉你你的程序使用了多少SM,多少warp,多少registers,以及每个register中所存放的内容,SM的利用率,硬件基本信息等等。除了debug,Nsight还集成了visual profiler的功能,即可视化程序每个部分的执行时间,以便找到程序可优化之处:
以如下简单code为例:

1
2
3
4
5
6
7
8
9
10
11
12
13
14
15
16
17
18
#include <stdio.h>
__global__ void kernel(int N){
unsigned int tid = threadIdx.x + blockDim.x * blockIdx.x;
unsigned int stride = blockDim.x * gridDim.x;

for (int idd=tid; idd<N; idd+=stride){
printf("hello from thread: %d\n", idd);
}
}

int main(int argc, char** argv){

kernel<<<2, 12>>>(36);
cudaDeviceSynchronize(); //同步Device和Host,即,device 执行完后再执行Host

printf("hello from Host\n");
return 0;
}

即我有36个元素要处理,使用32个线程,并且32个线程分配到1个block中。当启用debug时,可以得到Device端的信息。
从硬件角度看:

可以看到我的GPU编号为0,共有5个SM,使用了2个SM,每个SM都有64分warp,只使用了1个warp。

具体看一个SM中的一个warp。一个warp有32个线程,此处只使用了12个。

从逻辑角度看:启用了两个block,分别在两个SM中。

每个block使用12个线程。

另外Nsight还会给出Host的信息,如下:

以下是GPU中registers中的信息:

以及dissambly信息:

当生成可执行文件后,便可以使用profiler测程序的性能。


CUDA

CUDA-project review

这篇blog记录了项目中使用或未使用到的CUDA知识点。

  • __constant__ float d_arr[10] 在constant memory中开辟10个空间。

  • cudaMemcpyToSymbol(d_arr, h_arr, sizeof(h_arr)) 将Host中的数据复制进Device中所开辟的空间。

  • __device__ float d_arr[10][5] 在Global memory中开辟空间。

  • cudaMemcpyFromSymbol(h_arr,d_arr, sizeof(d_arr)) 将Device中的数据复制到Host中所开辟的空间。

  • local memory中开辟空间,lifetime为threads的周期:

    1
    2
    3
    4
    __global__ void func(){
    float tmp[7];
    ...
    }
  • 使用registers而非local memory,当所需数据大小较小,且数量固定时将float a[3] 改写成float a0,a1,a2.

  • 使用grid-stride-loop。其中idd需要根据实际问题计算得到:

    1
    2
    3
    4
    5
    6
    7
    __global__ void func(){
    int tid = ...;
    int stride = ...;
    for (int idd = tid; idd<N; idd+=stride){
    // idd is the thread id in this loop;
    }
    }

    使用grid-stride-loop 后,将kernel函数改为<<<1,1>>>,并且在适当的位置加上打印语句。便于调试。

  • 实现时,在cuda相关的 语句前加上checkCudaError().这个函数要自己实现。

  • 在调用跟kernel函数后,加上checkCudaError(cudaGetLatError());

  • 根据当前问题找example中可用内容。

  • 实验函数,先用笔在纸上实现,定义内个变量的含义,左后写code。

  • 在一个较大的实现中,保证一段code一个功能,这一段的实现尽量不要使用其他段code的变量,尽量使每段code独立化。

  • pinned memory VS pageable memory.

  • deviceQuery 轻量级的方法。

  • 协作组

  • 对于 代操作数据为二维或三维点,一个技巧是,为了尽可能减少PCIe的使用,线程id天然可以表示成数据点的坐标:(idx,idy)<=>(x,y).

  • 因为Device段不能动态分配空间,所以当实现摸个算法的CPU版本时,要使用stack内存,开辟足够多的空间。

  • cudaMallocPitch();

  • cudaMemSet2D();

  • std::bitset<16> foo;

  • 角度与弧度的转化:1°=π/180,1rad=(180/π)°

  • choose device

  • multiple GPUs

  • 使用event给code计时。或自己写计时类。

  • Unified Memory.

  • 循环展开,减少操作。

  • 注意CPU code中不可并行的部分,如下:

    1
    2
    3
    if (tid < N){
    bb[tid+1] = count + bb[tid];
    }

    上面的指令只能串行执行。


CUDA

CUDA-optimize data transfer

Optimize Data Transfers

The peak bandwidth between the device memory and the GPU is much higher (144 GB/s on the NVIDIA Tesla C2050, for example) than the peak bandwidth between host memory and device memory (8 GB/s on PCIe x16 Gen2). This disparity means that your implementation of data transfers between the host and GPU devices can make or break your overall application performance.
Let’s start with a few general guidelines for host-device data transfers.

  1. Minimize the amount of data transferred between host and device when possible, even if that means running kernels on the GPU that get little or no speed-up compared to running them on the host CPU.
  2. Higher bandwidth is possible between the host and the device when using page-locked (or “pinned”) memory.
  3. Batching many small transfers into one larger transfer performs much better because it eliminates most of the per-transfer overhead.
  4. Data transfers between the host and device can sometimes be overlapped with kernel execution and other data transfers.

We investigate the first three guidelines above in this post, and we dedicate the next post to overlapping data transfers. First I want to talk about how to measure time spent in data transfers without modifying the source code.

Measuring Data Transfer Times with nvprof

To measure the time spent in each data transfer, we could record a CUDA event before and after each transfer and use cudaEventElapsedTime(), as we described in a previous post. However, we can get the elapsed transfer time without instrumenting the source code with CUDA events by using nvprof.
推荐使用nvprof,测试间。

使用实例.假如有一源文件·profile.cu, 编译:

1
2
$ nvcc profile.cu
$ nvprof ./a.out

It returns as follow:

1
2
3
4
5
6
7
$ nvprof ./a.out 
======== NVPROF is profiling a.out...
======== Command: a.out
======== Profiling result:
Time(%) Time Calls Avg Min Max Name
50.08 718.11us 1 718.11us 718.11us 718.11us [CUDA memcpy DtoH]
49.92 715.94us 1 715.94us 715.94us 715.94us [CUDA memcpy HtoD]

Minimizing Data Transfers

如果可以不传输数据,就不要传输。总之,尽量少用PCIe。

Pinned Host Memory

测试使用P106 和 GTX1060,使用pinned memory 并没有显著提高。

Batching Small Transfers

Due to the overhead associated with each transfer, it is preferable to batch many small transfers together into a single transfer. This is easy to do by using a temporary array, preferably pinned, and packing it with the data to be transferred.

For two-dimensional array transfers, you can use cudaMemcpy2D().

1
cudaMemcpy2D(dest, dest_pitch, src, src_pitch, w, h, cudaMemcpyHostToDevice)

The arguments here are a pointer to the first destination element and the pitch of the destination array, a pointer to the first source element and pitch of the source array, the width and height of the submatrix to transfer, and the memcpy kind. There is also a cudaMemcpy3D() function for transfers of rank three array sections.

原文作者 Mark Harris
原文链接


CUDA

CUDA-overlap data transfer

Overlap Data Transfers

目的是通过并发,隐藏延时。we discuss how to overlap data transfers with computation on the host。并发是指数据传输和host上的操作一同执行。Achieving overlap between data transfers and other operations requires the use of CUDA streams, so first let’s learn about streams.

CUDA Srteam

A stream in CUDA is a sequence of operations that execute on the device in the order in which they are issued by the host code. While operations within a stream are guaranteed to execute in the prescribed order, operations in different streams can be interleaved and, when possible, they can even run concurrently.

1. The default stream

All device operations (kernels and data transfers) in CUDA run in a stream. When no stream is specified, the default stream (also called the “null stream”) is used. The default stream is different from other streams because it is a synchronizing stream with respect to operations on the device: no operation in the default stream will begin until all previously issued operations in any stream on the device have completed, and an operation in the default stream must complete before any other operation (in any stream on the device) will begin.

Please note that CUDA 7, released in 2015, introduced a new option to use a separate default stream per host thread, and to treat per-thread default streams as regular streams (i.e. they don’t synchronize with operations in other streams)

Let’s look at some simple code examples that use the default stream, and discuss how operations progress from the perspective of the host as well as the device.

1
2
3
cudaMemcpy(d_a, a, numBytes, cudaMemcpyHostToDevice);
increment<<<1,N>>>(d_a)
cudaMemcpy(a, d_a, numBytes, cudaMemcpyDeviceToHost);

From the perspective of the device, all three operations are issued to the same (default) stream and will execute in the order that they were issued.

From the perspective of the host, the implicit data transfers are blocking or synchronous transfers, while the kernel launch is asynchronous.

Since the host-to-device data transfer on the first line is synchronous, the CPU thread will not reach the kernel call on the second line until the host-to-device transfer is complete. Once the kernel is issued, the CPU thread moves to the third line, but the transfer on that line cannot begin due to the device-side order of execution.

The asynchronous behavior of kernel launches from the host’s perspective makes overlapping device and host computation very simple. We can modify the code to add some independent CPU computation as follows.

1
2
3
4
cudaMemcpy(d_a, a, numBytes, cudaMemcpyHostToDevice);
increment<<<1,N>>>(d_a) // device 执行这个
myCpuFunction(b) // 同时 host 执行这个
cudaMemcpy(a, d_a, numBytes, cudaMemcpyDeviceToHost);

上述code实现了一个overlap,在increment()myCpuFunction()同时分别在device和host端执行。Whether the host function or device kernel completes first doesn’t affect the subsequent device-to-host transfer, which will begin only after the kernel completes. From the perspective of the device, nothing has changed from the previous example; the device is completely unaware of myCpuFunction(). 从device的角度看,device并不知道myCpuFunction()这个操作的存在,device端的操作与前一段code一模一样。

2. Non-default streams

Non-default streams in CUDA C/C++ are declared, created, and destroyed in host code as follows.

1
2
3
4
cudaStream_t stream1;    // 声明一个stream
cudaError_t result;
result = cudaStreamCreate(&stream1) // create
result = cudaStreamDestroy(stream1) // destroy

To issue a data transfer to a non-default stream we use the cudaMemcpyAsync() function, which is similar to the cudaMemcpy() function discussed in the previous post, but takes a stream identifier as a fifth argument.

1
result = cudaMemcpyAsync(d_a, a, N, cudaMemcpyHostToDevice, stream1)

cudaMemcpyAsync() is non-blocking on the host, so control returns to the host thread immediately after the transfer is issued. There are cudaMemcpy2DAsync() and cudaMemcpy3DAsync() variants of this routine which can transfer 2D and 3D array sections asynchronously in the specified streams.

To issue a kernel to a non-default stream we specify the stream identifier as a fourth execution configuration parameter (the third execution configuration parameter allocates shared device memory, which we’ll talk about later; use 0 for now).

1
increment<<<1, N, 0, stream1>>>(d_a)

3. Synchronization with streams

在执行cudaMemcpy()时,code变为同步的,就是说,host code要等待这个copy函数执行完毕,才能接着往下执行。而all operations in non-default streams are non-blocking with respect to the host code, you will run across situations where you need to synchronize the host code with operations in a stream. 同步就需要我们来做了。有若干种方法来同步:The “heavy hammer” way is to use cudaDeviceSynchronize(), which blocks the host code until all previously issued operations on the device have completed. In most cases this is overkill, and can really hurt performance due to stalling the entire device and host thread.

The CUDA stream API has multiple less severe methods of synchronizing the host with a stream.

  • cudaStreamSynchronize(stream) can be used to block the host thread until all previously issued operations in the specified stream have completed.
  • cudaStreamQuery(stream) tests whether all operations issued to the specified stream have completed, without blocking host execution.
  • cudaEventSynchronize(event) & cudaEventQuery(event) act similar to their stream counterparts, except that their result is based on whether a specified event has been recorded rather than whether a specified stream is idle.
  • cudaStreamWaitEvent(event) You can also synchronize operations within a single stream on a specific event using cudaStreamWaitEvent(event) (even if the event is recorded in a different stream, or on a different device!).

Overlapping Kernel Execution and Data Transfers

Earlier we demonstrated how to overlap kernel execution in the default stream with execution of code on the host. But our main goal in this post is to show you how to overlap kernel execution with data transfers. There are several requirements for this to happen. There are several requirements for this to happen.

  • The device must be capable of “concurrent copy and execution”. This can be queried from the deviceOverlap field of a cudaDeviceProp struct, or from the output of the deviceQuery sample included with the CUDA SDK/Toolkit. Nearly all devices with compute capability 1.1 and higher have this capability.
  • The kernel execution and the data transfer to be overlapped must both occur in different, non-default streams.
  • The host memory involved in the data transfer must be pinned memory.

附录为实例程序,we break up the array of size N into chunks of streamSize elements. Since the kernel operates independently on all elements, each of the chunks can be processed independently. The number of (non-default) streams used is nStreams=N/streamSize. There are multiple ways to implement the domain decomposition of the data and processing; one is to loop over all the operations for each chunk of the array as in this example code.

原文内容作者Mark Harris
原文链接
原文程序


CUDA

附录
完整code:

1
2
3
4
5
6
7
8
9
10
11
12
13
14
15
16
17
18
19
20
21
22
23
24
25
26
27
28
29
30
31
32
33
34
35
36
37
38
39
40
41
42
43
44
45
46
47
48
49
50
51
52
53
54
55
56
57
58
59
60
61
62
63
64
65
66
67
68
69
70
71
72
73
74
75
76
77
78
79
80
81
82
83
84
85
86
87
88
89
90
91
92
93
94
95
96
97
98
99
100
101
102
103
104
105
106
107
108
109
110
111
112
113
114
115
116
117
118
119
120
121
122
123
124
125
126
127
128
129
130
131
132
133
134
135
136
137
#include <stdio.h>

// Convenience function for checking CUDA runtime API results
// can be wrapped around any runtime API call. No-op in release builds.
inline cudaError_t checkCuda(cudaError_t result)
{
#if defined(DEBUG) || defined(_DEBUG)
if (result != cudaSuccess) {
fprintf(stderr, "CUDA Runtime Error: %s\n", cudaGetErrorString(result));
assert(result == cudaSuccess);
}
#endif
return result;
}

__global__ void kernel(float *a, int offset)
{
int i = offset + threadIdx.x + blockIdx.x*blockDim.x;
float x = (float)i;
float s = sinf(x);
float c = cosf(x);
a[i] = a[i] + sqrtf(s*s+c*c);
}

float maxError(float *a, int n)
{
float maxE = 0;
for (int i = 0; i < n; i++) {
float error = fabs(a[i]-1.0f);
if (error > maxE) maxE = error;
}
return maxE;
}

int main(int argc, char **argv)
{
const int blockSize = 256, nStreams = 4;
const int n = 4 * 1024 * blockSize * nStreams;
const int streamSize = n / nStreams;
const int streamBytes = streamSize * sizeof(float);
const int bytes = n * sizeof(float);

int devId = 0;
if (argc > 1) devId = atoi(argv[1]);

cudaDeviceProp prop;
checkCuda( cudaGetDeviceProperties(&prop, devId));
printf("Device : %s\n", prop.name);
checkCuda( cudaSetDevice(devId) );

// allocate pinned host memory and device memory
float *a, *d_a;
checkCuda( cudaMallocHost((void**)&a, bytes) ); // host pinned
checkCuda( cudaMalloc((void**)&d_a, bytes) ); // device

float ms; // elapsed time in milliseconds

// create events and streams
cudaEvent_t startEvent, stopEvent, dummyEvent;
cudaStream_t stream[nStreams];
checkCuda( cudaEventCreate(&startEvent) );
checkCuda( cudaEventCreate(&stopEvent) );
checkCuda( cudaEventCreate(&dummyEvent) );
for (int i = 0; i < nStreams; ++i)
checkCuda( cudaStreamCreate(&stream[i]) );

// baseline case - sequential transfer and execute
memset(a, 0, bytes);
checkCuda( cudaEventRecord(startEvent,0) );
checkCuda( cudaMemcpy(d_a, a, bytes, cudaMemcpyHostToDevice) );
kernel<<<n/blockSize, blockSize>>>(d_a, 0);
checkCuda( cudaMemcpy(a, d_a, bytes, cudaMemcpyDeviceToHost) );
checkCuda( cudaEventRecord(stopEvent, 0) );
checkCuda( cudaEventSynchronize(stopEvent) );
checkCuda( cudaEventElapsedTime(&ms, startEvent, stopEvent) );
printf("Time for sequential transfer and execute (ms): %f\n", ms);
printf(" max error: %e\n", maxError(a, n));

// asynchronous version 1: loop over {copy, kernel, copy}
memset(a, 0, bytes);
checkCuda( cudaEventRecord(startEvent,0) );
for (int i = 0; i < nStreams; ++i) {
int offset = i * streamSize;
checkCuda( cudaMemcpyAsync(&d_a[offset], &a[offset],
streamBytes, cudaMemcpyHostToDevice,
stream[i]) );
kernel<<<streamSize/blockSize, blockSize, 0, stream[i]>>>(d_a, offset);
checkCuda( cudaMemcpyAsync(&a[offset], &d_a[offset],
streamBytes, cudaMemcpyDeviceToHost,
stream[i]) );
}
checkCuda( cudaEventRecord(stopEvent, 0) );
checkCuda( cudaEventSynchronize(stopEvent) );
checkCuda( cudaEventElapsedTime(&ms, startEvent, stopEvent) );
printf("Time for asynchronous V1 transfer and execute (ms): %f\n", ms);
printf(" max error: %e\n", maxError(a, n));

// asynchronous version 2:
// loop over copy, loop over kernel, loop over copy
memset(a, 0, bytes);
checkCuda( cudaEventRecord(startEvent,0) );
for (int i = 0; i < nStreams; ++i)
{
int offset = i * streamSize;
checkCuda( cudaMemcpyAsync(&d_a[offset], &a[offset],
streamBytes, cudaMemcpyHostToDevice,
stream[i]) );
}
for (int i = 0; i < nStreams; ++i)
{
int offset = i * streamSize;
kernel<<<streamSize/blockSize, blockSize, 0, stream[i]>>>(d_a, offset);
}
for (int i = 0; i < nStreams; ++i)
{
int offset = i * streamSize;
checkCuda( cudaMemcpyAsync(&a[offset], &d_a[offset],
streamBytes, cudaMemcpyDeviceToHost,
stream[i]) );
}
checkCuda( cudaEventRecord(stopEvent, 0) );
checkCuda( cudaEventSynchronize(stopEvent) );
checkCuda( cudaEventElapsedTime(&ms, startEvent, stopEvent) );
printf("Time for asynchronous V2 transfer and execute (ms): %f\n", ms);
printf(" max error: %e\n", maxError(a, n));

// cleanup
checkCuda( cudaEventDestroy(startEvent) );
checkCuda( cudaEventDestroy(stopEvent) );
checkCuda( cudaEventDestroy(dummyEvent) );
for (int i = 0; i < nStreams; ++i)
checkCuda( cudaStreamDestroy(stream[i]) );
cudaFree(d_a);
cudaFreeHost(a);

return 0;
}

CUDA-Performance Metrics

Implement Performance Metrics in CUDA

“Before we jump into these performance measurement techniques, we need to discuss how to synchronize execution between the host and device.”
why? 因为有些指令同步执行,有些指令异步执行。只有知道了区别才可以正确测量性能。

遇到cudaMemcpy() 执行变成同步的,也就是说,所有指令必须等待其他指令执行到此,才可以一起向下继续执行。如果没有cudaMemcpy(),可以使用cudaDeviceSynchronize()实现同步。

使用CPU的timer

1
2
3
4
5
6
7
8
9
cudaMemcpy(d_x, x, N*sizeof(float), cudaMemcpyHostToDevice);
cudaMemcpy(d_y, y, N*sizeof(float), cudaMemcpyHostToDevice);

t1 = myCPUTimer();
saxpy<<<(N+255)/256, 256>>>(N, 2.0, d_x, d_y);
cudaDeviceSynchronize(); //
t2 = myCPUTimer();

cudaMemcpy(y, d_y, N*sizeof(float), cudaMemcpyDeviceToHost);

“we use the explicit synchronization barrier cudaDeviceSynchronize() to block CPU execution until all previously issued commands on the device have completed. Without this barrier, this code would measure the kernel launch time and not the kernel execution time.” 在这里犯过错,CPU负责控制,当执行到kernel函数时,是CPU调用kernel函数,但是在GPU上执行,CPU调用之后,马上执行下面的语句,如果没有cudaDeviceSynchronize(),CPU会执行t2,如此一来t2-t1测的是调用kernel的时间,而非kernel执行的时间。也就是说,CPU与GPU是异步的,只有加上cudaDeviceSynchronize(),告诉CPU等待GPU把kernel执行完毕,后一同执行t2.

Timing using CUDA Events

A problem with using host-device synchronization points, such as cudaDeviceSynchronize(), is that they stall the GPU pipeline. For this reason, CUDA offers a relatively light-weight alternative to CPU timers via the CUDA event API. The CUDA event API includes calls to create and destroy events, record events, and compute the elapsed time in milliseconds between two recorded events.

A CUDA stream is simply a sequence of operations that are performed in order on the device. Operations in different streams can be interleaved and in some cases overlapped—a property that can be used to hide data transfers between the host and the device

默认使用的stream 0,
Up to now, all operations on the GPU have occurred in the default stream, or stream 0 (also called the “Null Stream”).

here is an example:

1
2
3
4
5
6
7
8
9
10
11
12
13
14
15
16
cudaEvent_t start, stop;
cudaEventCreate(&start);
cudaEventCreate(&stop);

cudaMemcpy(d_x, x, N*sizeof(float), cudaMemcpyHostToDevice);
cudaMemcpy(d_y, y, N*sizeof(float), cudaMemcpyHostToDevice);

cudaEventRecord(start);
saxpy<<<(N+255)/256, 256>>>(N, 2.0f, d_x, d_y);
cudaEventRecord(stop);

cudaMemcpy(y, d_y, N*sizeof(float), cudaMemcpyDeviceToHost);

cudaEventSynchronize(stop);
float milliseconds = 0;
cudaEventElapsedTime(&milliseconds, start, stop);

这个计时器记录的是核函数的执行时间。

CUDA events are of type cudaEvent_t and are created and destroyed with cudaEventCreate() and cudaEventDestroy(). In the above code cudaEventRecord() places the start and stop events into the default stream, stream 0. The device will record a time stamp for the event when it reaches that event in the stream. The function cudaEventSynchronize() blocks CPU execution until the specified event is recorded. The cudaEventElapsedTime() function returns in the first argument the number of milliseconds time elapsed between the recording of start and stop. This value has a resolution of approximately one half microsecond.

Memory Bandwidth

我们需要知道极限带宽,和实际带宽。

极限带宽(理论带宽)

Theoretical bandwidth can be calculated using hardware specifications available in the product literature. For example, the NVIDIA Tesla M2050 GPU uses DDR (double data rate) RAM with a memory clock rate of 1,546 MHz and a 384-bit wide memory interface. Using these data items, the peak theoretical memory bandwidth of this GPU can be computed using the following:

1
BWTheoretical = 1546 * 10^6 * (384/8) * 2 / 10^9 = 148 GB/s

解释:In this calculation, we convert the memory clock rate to Hz, multiply it by the interface width (divided by 8, to convert bits to bytes) and multiply by 2 due to the double data rate. Finally, we divide by 109 to convert the result to GB/s.

实际带宽

We calculate effective bandwidth by timing specific program activities and by knowing how our program accesses data. We use the following equation.

1
BWEffective = (RB + WB) / (t * 10^9)

Here, BWEffective is the effective bandwidth in units of GB/s, RB is the number of bytes read per kernel, WB is the number of bytes written per kernel, and t is the elapsed time given in seconds.

实例:

1
2
3
4
5
6
7
8
9
10
11
12
13
14
15
16
17
18
19
20
21
22
23
24
25
26
27
28
29
30
31
32
33
34
35
36
37
38
39
40
41
42
43
44
45
46
47
48
__global__
void saxpy(int n, float a, float *x, float *y){
int i = blockIdx.x*blockDim.x + threadIdx.x;
if (i < n) y[i] = a*x[i] + y[i];
}

int main(void){
int N = 20 * (1 << 20);
float *x, *y, *d_x, *d_y;
x = (float*)malloc(N*sizeof(float));
y = (float*)malloc(N*sizeof(float));

cudaMalloc(&d_x, N*sizeof(float));
cudaMalloc(&d_y, N*sizeof(float));

for (int i = 0; i < N; i++) {
x[i] = 1.0f;
y[i] = 2.0f;
}

cudaEvent_t start, stop;
cudaEventCreate(&start);
cudaEventCreate(&stop);

cudaMemcpy(d_x, x, N*sizeof(float), cudaMemcpyHostToDevice);
cudaMemcpy(d_y, y, N*sizeof(float), cudaMemcpyHostToDevice);

cudaEventRecord(start);

// Perform SAXPY on 1M elements
saxpy<<<(N+511)/512, 512>>>(N, 2.0f, d_x, d_y);

cudaEventRecord(stop);

cudaMemcpy(y, d_y, N*sizeof(float), cudaMemcpyDeviceToHost);

cudaEventSynchronize(stop);
float milliseconds = 0;
cudaEventElapsedTime(&milliseconds, start, stop);

float maxError = 0.0f;
for (int i = 0; i < N; i++) {
maxError = max(maxError, abs(y[i]-4.0f));
}

printf("Max error: %fn", maxError);
printf("Effective Bandwidth (GB/s): %fn", N*4*3/milliseconds/1e6);
}

In the bandwidth calculation, N*4 is the number of bytes transferred per array read or write, and the factor of three represents the reading of x and the reading and writing of y. The elapsed time is stored in the variable milliseconds to make units clear. Note that in addition to adding the functionality needed for the bandwidth calculation, we have also changed the array size and the thread-block size.

CUDA events use the GPU timer and therefore avoid the problems associated with host-device synchronization

原文作者Mark Harris
原文链接


CUDA

CUDA-Unified Memory

Unified Memory

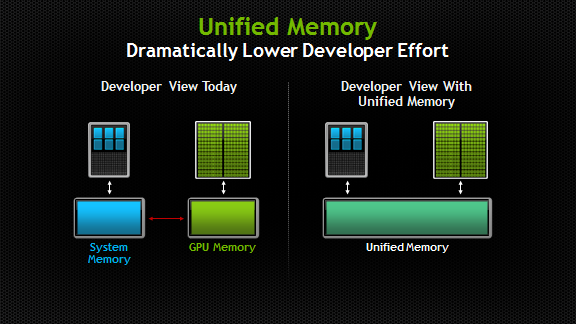
Unified Memory 是个逻辑概念,就像字面上所说,把Host内存和Device内存逻辑上放到一起,如此一来,对于程序员来说,就没有Host和Device之分了,表面上就更容易编写程序了。如下图所示。
“Unified Memory creates a pool of managed memory that is shared between the CPU and GPU, bridging the CPU-GPU divide. Managed memory is accessible to both the CPU and GPU using a single pointer. The key is that the system automatically migrates data allocated in Unified Memory between host and device so that it looks like CPU memory to code running on the CPU, and like GPU memory to code running on the GPU.”

如下是使用Unified memory一般情况:

1
2
3
4
5
6
7
8
9
10
11
12
// Allocate Unified Memory -- accessible from CPU or GPU
float *x, *y;
cudaMallocManaged(&x, N*sizeof(float));
cudaMallocManaged(&y, N*sizeof(float));
...
kernel<<<grid, threads>>>();
cudaDeviceSynchronize()
...

// Free memory
cudaFree(x);
cudaFree(y);

但是注意了,使用这种方式时,要加上cudaDeviceSynchronize()。保证
“Just one more thing: I need the CPU to wait until the kernel is done before it accesses the results (because CUDA kernel launches don’t block the calling CPU thread). To do this I just call cudaDeviceSynchronize() before doing the final error checking on the CPU.”

这种方法使得在逻辑上,xy不区分是存在于host 还是存在于device

原文作者Mark Harris
原文链接


CUDA

CUDA:-Vectorized Memory Access

Increase Performance with Vectorized Memory Access

Many CUDA kernels are bandwidth bound, and the increasing ratio of flops to bandwidth in new hardware results in more bandwidth bound kernels. This makes it very important to take steps to mitigate bandwidth bottlenecks in your code. In this post, I will show you how to use vector loads and stores in CUDA C/C++ to help increase bandwidth utilization while decreasing the number of executed instructions.

1
2
3
4
5
6
7
8
9
10
11
12
13
__global__ void device_copy_scalar_kernel(int* d_in, int* d_out, int N) { 
int idx = blockIdx.x * blockDim.x + threadIdx.x;
for (int i = idx; i < N; i += blockDim.x * gridDim.x){
d_out[i] = d_in[i];
}
}

void device_copy_scalar(int* d_in, int* d_out, int N)
{
int threads = 128;
int blocks = min((N + threads-1) / threads, MAX_BLOCKS);
device_copy_scalar_kernel<<<blocks, threads>>>(d_in, d_out, N);
}

We can inspect the assembly for this kernel using the cuobjdump tool included with the CUDA Toolkit.%> cuobjdump -sass executable.
The SASS for the body of the scalar copy kernel is the following:

1
2
3
4
5
6
/*0058*/ IMAD R6.CC, R0, R9, c[0x0][0x140]                
/*0060*/ IMAD.HI.X R7, R0, R9, c[0x0][0x144]
/*0068*/ IMAD R4.CC, R0, R9, c[0x0][0x148]
/*0070*/ LD.E R2, [R6]
/*0078*/ IMAD.HI.X R5, R0, R9, c[0x0][0x14c]
/*0090*/ ST.E [R4], R2

Here we can see a total of six instructions associated with the copy operation. The four IMAD instructions compute the load and store addresses and the LD.E and ST.E load and store 32 bits from those addresses.

We can improve performance of this operation by using the vectorized load and store instructions LD.E.{64,128} and ST.E.{64,128}.

These operations also load and store data but do so in 64- or 128-bit widths. Using vectorized loads reduces the total number of instructions, reduces latency, and improves bandwidth utilization.

The easiest way to use vectorized loads is to use the vector data types defined in the CUDA C/C++ standard headers, such as int2, int4, or float2. You can easily use these types via type casting in C/C++. For example in C++ you can recast the int pointer d_in to an int2 pointer using reinterpret_cast<int2*>(d_in). In C99 you can do the same thing using the casting operator: (int2*(d_in)).

Dereferencing those pointers will cause the compiler to generate the vectorized instructions. However, there is one important caveat: these instructions require aligned data. Device-allocated memory is automatically aligned to a multiple of the size of the data type, but if you offset the pointer the offset must also be aligned. For example reinterpret_cast<int2*>(d_in+1) is invalid because d_in+1 is not aligned to a multiple of sizeof(int2).

You can safely offset arrays if you use an “aligned” offset, as in reinterpret_cast<int2*>(d_in+2). You can also generate vectorized loads using structures as long as the structure is a power of two bytes in size.

Now that we have seen how to generate vectorized instructions let’s modify the memory copy kernel to use vector loads.

1
2
3
4
5
6
7
8
9
10
11
12
13
14
15
16
17
__global__ void device_copy_vector2_kernel(int* d_in, int* d_out, int N) {
int idx = blockIdx.x * blockDim.x + threadIdx.x;
for (int i = idx; i < N/2; i += blockDim.x * gridDim.x) {
reinterpret_cast<int2*>(d_out)[i] = reinterpret_cast<int2*>(d_in)[i];
}

// in only one thread, process final element (if there is one)
if (idx==N/2 && N%2==1)
d_out[N-1] = d_in[N-1];
}

void device_copy_vector2(int* d_in, int* d_out, int n) {
threads = 128;
blocks = min((N/2 + threads-1) / threads, MAX_BLOCKS);

device_copy_vector2_kernel<<<blocks, threads>>>(d_in, d_out, N);
}

This kernel has only a few changes. First, the loop now executes only N/2 times because each iteration processes two elements. Second, we use the casting technique described above in the copy. Third, we handle any remaining elements which may arise if N is not divisible by 2. Finally, we launch half as many threads as we did in the scalar kernel.

Inspecting the SASS we see the following.

1
2
3
4
5
6
/*0088*/                IMAD R10.CC, R3, R5, c[0x0][0x140]              
/*0090*/ IMAD.HI.X R11, R3, R5, c[0x0][0x144]
/*0098*/ IMAD R8.CC, R3, R5, c[0x0][0x148]
/*00a0*/ LD.E.64 R6, [R10]
/*00a8*/ IMAD.HI.X R9, R3, R5, c[0x0][0x14c]
/*00c8*/ ST.E.64 [R8], R6

Notice that now the compiler generates LD.E.64 and ST.E.64. All the other instructions are the same. However, it is important to note that there will be half as many instructions executed because the loop only executes N/2 times. This 2x improvement in instruction count is very important in instruction-bound or latency-bound kernels.

We can also write a vector4 version of the copy kernel.

1
2
3
4
5
6
7
8
9
10
11
12
13
14
15
16
17
18
19
20
21
22
__global__ void device_copy_vector4_kernel(int* d_in, int* d_out, int N) {
int idx = blockIdx.x * blockDim.x + threadIdx.x;
for(int i = idx; i < N/4; i += blockDim.x * gridDim.x) {
reinterpret_cast<int4*>(d_out)[i] = reinterpret_cast<int4*>(d_in)[i];
}

// in only one thread, process final elements (if there are any)
int remainder = N%4;
if (idx==N/4 && remainder!=0) {
while(remainder) {
int idx = N - remainder--;
d_out[idx] = d_in[idx];
}
}
}

void device_copy_vector4(int* d_in, int* d_out, int N) {
int threads = 128;
int blocks = min((N/4 + threads-1) / threads, MAX_BLOCKS);

device_copy_vector4_kernel<<<blocks, threads>>>(d_in, d_out, N);
}

The corresponding SASS is the following:

1
2
3
4
5
6
/*0090*/                IMAD R10.CC, R3, R13, c[0x0][0x140]              
/*0098*/ IMAD.HI.X R11, R3, R13, c[0x0][0x144]
/*00a0*/ IMAD R8.CC, R3, R13, c[0x0][0x148]
/*00a8*/ LD.E.128 R4, [R10]
/*00b0*/ IMAD.HI.X R9, R3, R13, c[0x0][0x14c]
/*00d0*/ ST.E.128 [R8], R4

Here we can see the generated LD.E.128 and ST.E.128. This version of the code has reduced the instruction count by a factor of 4.

In almost all cases vectorized loads are preferable to scalar loads. Note however that using vectorized loads increases register pressure and reduces overall parallelism. So if you have a kernel that is already register limited or has very low parallelism, you may want to stick to scalar loads. Also, as discussed earlier, if your pointer is not aligned or your data type size in bytes is not a power of two you cannot use vectorized loads.

Vectorized loads are a fundamental CUDA optimization that you should use when possible, because they increase bandwidth, reduce instruction count, and reduce latency. In this post, I’ve shown how you can easily incorporate vectorized loads into existing kernels with relatively few changes.


原文作者Justin Luitjens 原文链接

CUDA-Grid stride Loop

目的是更新thread ID,同笔记【CUDA-更新线程ID】。

Grid-stride loop

Grid-stride loop 长这个样子:

1
2
3
4
5
6
__global__ void add(int n, float *x, float *y){
int index = blockIdx.x * blockDim.x + threadIdx.x;
int stride = blockDim.x * gridDim.x;
for (int i = index; i < n; i += stride)
y[i] = x[i] + y[i];
}

当有足够的线程可以覆盖所有需要处理的数据时,一个线程处理一个数据。线程ID不需要更新,一次并行执行结束,如下:
Common CUDA guidance is to launch one thread per data element, which means to parallelize the above SAXPY loop we write a kernel that assumes we have enough threads to more than cover the array size:

1
2
3
4
5
__global__ void saxpy(int n, float a, float *x, float *y) {
int i = blockIdx.x * blockDim.x + threadIdx.x;
if (i < n)
y[i] = a * x[i] + y[i];
}

一个grid可以覆盖所有数据,这种方式的kernel被称作monolithic kernel. 如下kernel可以一次处理1M的数据量:

1
2
// Perform SAXPY on 1M elements
saxpy<<<4096,256>>>(1<<20, 2.0, x, y);

但是,当数据量很大时,超过可用的线程数,那么所有线程由不能只干一次活了,所有线程做完一批后更新ID接着做下一批。这种方式被称作grid-stride loop,如下边的kernel:

1
2
3
4
5
6
7
__global__ void saxpy(int n, float a, float *x, float *y) {
for (int i = blockIdx.x * blockDim.x + threadIdx.x;
i < n;
i += blockDim.x * gridDim.x) {
y[i] = a * x[i] + y[i];
}
}

自然地,更新ID的方式就是,让ID加上grid的大小,即所有线程个数。一个grid 的所有线程个数就是blockDim.x * gridDim.x
这个值可以称作为ID更新步长。加入我有1280个线程,那么线程0 将会处理元素0,1280,2560,…。这样做的好处是,保证了相邻的线程处理相邻的数据,这是效率最高的执行方式。如本文所讲“we ensure that all addressing within warps is unit-stride, so we get maximum memory coalescing, just as in the monolithic version.”

总结下grid-stride loop的优势:

1) Scalability and thread reuse.

保证可以处理任何量的数据,一批一批地串行就可以啦,没办法,可用线程数有限,这可以保证所有数据正确被处理。另一方面,可以限制block的数量,做微调,尝试提升性能。
“By using a loop, you can support any problem size. even if it exceeds the largest grid size your CUDA device supports. Moreover, you can limit the number of blocks you use to tune performance. For example, it’s often useful to launch a number of blocks that is a multiple of the number of multiprocessors on the device, to balance utilization. As an example, we might launch the loop version of the kernel like this:”

1
2
3
4
int numSMs;
cudaDeviceGetAttribute(&numSMs, cudaDevAttrMultiProcessorCount, devId);
// Perform SAXPY on 1M elements
saxpy<<<32*numSMs, 256>>>(1 << 20, 2.0, x, y);

When you limit the number of blocks in your grid, threads are reused for multiple computations. Thread reuse amortizes thread creation and destruction cost along with any other processing the kernel might do before or after the loop (such as thread-private or shared data initialization).

2) Debugging

方便Debug。只是用一个线程,使整个过程变为串行处理,通过使用打印语句,找到错误,便于修改。
By using a loop instead of a monolithic kernel, you can easily switch to serial processing by launching one block with one thread.

1
saxpy<<<1,1>>>(1<<20, 2.0, x, y);

This makes it easier to emulate a serial host implementation to validate results, and it can make printf debugging easier by serializing the print order. Serializing the computation also allows you to eliminate numerical variations caused by changes in the order of operations from run to run, helping you to verify that your numerics are correct before tuning the parallel version.

3) Portability and readability

The grid-stride loop code is more like the original sequential loop code than the monolithic kernel code, making it clearer for other users. In fact we can pretty easily write a version of the kernel that compiles and runs either as a parallel CUDA kernel on the GPU or as a sequential loop on the CPU. The Hemi library provides a grid_stride_range() helper that makes this trivial using C++11 range-based for loops.

1
2
3
4
5
6
HEMI_LAUNCHABLE
void saxpy(int n, float a, float *x, float *y){
for (auto i : hemi::grid_stride_range(0, n)) {
y[i] = a * x[i] + y[i];
}
}

We can launch the kernel using this code, which generates a kernel launch when compiled for CUDA, or a function call when compiled for the CPU. hemi::cudaLaunch(saxpy, 1<<20, 2.0, x, y);
Grid-stride loops are a great way to make your CUDA kernels flexible, scalable, debuggable, and even portable.

原文内容来自 Mark Harris
原文链接


CUDA

CUDA-求三角形顶点坐标-Cross Production

三角型,已知三个角度和两个定点坐标,求第三个定点坐标

一个三角形,已知两个顶点坐标p1p2,和三个顶角angle1, angle2, angle3,求第三个顶点p3的坐标。方法如下:

1
2
3
x = (p1X * cot(angle2) + p2X * cot(angle1) + p2Y - p1Y) / cot(angle1) + cot(angle2));

y = (p1Y * cot(angle2) + p2Y * cot(angle1) + p1X - p2X) / (cot(angle1) + cot(angle2));

其中 cot(alpha) = 1/tan(alpha);, 注意,p1p2p3逆时针位置关系。

叉乘-Cross Production

叉乘是用于判断点与向量的位置关系。如已知向量起点为 p1,终点为 p2,待判断的点为 pt。那么点与向量的位置关系由以下公式决定:

1
float tmp = (pt1->y - pt2->y)*pt->x + (pt2->x - pt1->x)*pt->y + pt1->x*pt2->y - pt2->x*pt1->y;

其中各个点由struct 定义:

1
2
3
4
5
struct Points{
int x;
int y;
float value;
};

简单的数学完整实现:

1
2
3
4
5
6
7
8
9
10
11
12
13
14
15
16
17
18
19
20
21
22
23
24
25
26
27
28
29
30
31
32
33
34
35
36
37
38
39
40
41
42
43
44
45
46
47
48
49
50
51
52
53
54
55
#include <stdlib.h>
#include <stdio.h>

struct Points{
int x;
int y;
float value;
};

int pointLinePosition(struct Points*, struct Points*, struct Points*);

int main(int argc, char** argv){
// 已知的向量
struct Points p0, p1;
p0.x = 0, p0.y = 0;
p1.x = 2, p1.y = 6;

// 待判断的点
struct Points px;
px.x = 5, px.y = 100;

int res = pointLinePosition(&p0, &p1, &px);

if (res == 1){
printf("left on \n");
}
else if (res == 0)
printf("right \n");

return 0;
}

// Determine the position bewteen a VECTOR(pt1->pt2) and a POINT(pt)
int pointLinePosition(struct Points* pt1,
struct Points* pt2,
struct Points* pt){

float tmp = (pt1->y - pt2->y)*pt->x +
(pt2->x - pt1->x)*pt->y +
pt1->x*pt2->y -
pt2->x*pt1->y;

if (tmp > 0 ){
printf("tmp: %.5f \n", tmp);
return 1;
}
else if(tmp < 0){
printf("tmp: %.5f \n", tmp);
return 0;
}
else{
printf("tmp: %.5f \n", tmp);
return 1;
}
}